- Introduction
- Requirements to setup ICTContact
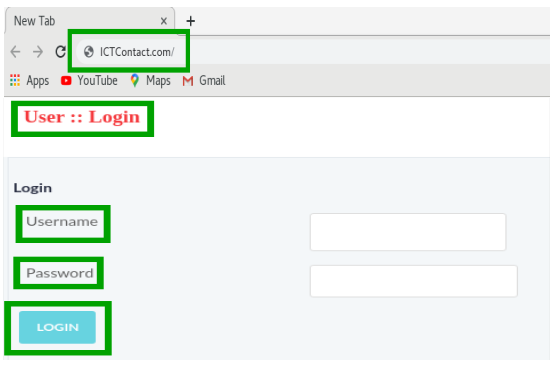
- To Login as Admin
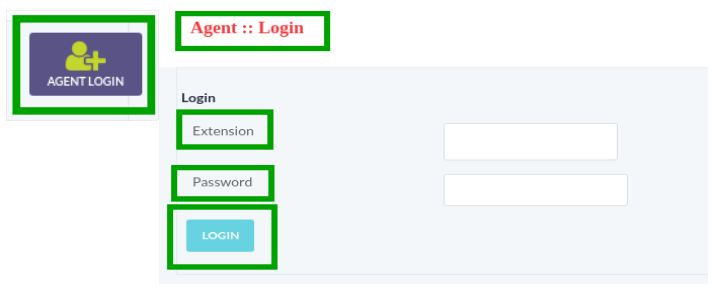
- To Login as Agent
- Admin Panel
- Create Contact Group
- To upload Voice Recording
- Launch New Campaign
- Campaigns
- Contacts
- Messages
- Administration
- Account
- Agent Evaluation
1. Introduction:
ICTContact is advance contact centre solution featuring progressing dialing multi-tenant, unified communication and CRM business automation and integration supporting voice, SMS, email, technologies suitable for contact centres enterprises/entrepreneurs and service providers. ICTContact offers smart WebRTC (Web Real-Time Communication) agent bases progressive dialing capabilities. It enables service provider to offer a wide rage of contact centre services to their users. It can be scaled to support thousands of agents also it fits most of the inbound/outbound contact centre scenarios and business automation, it is simple reliable powerful and provides a user friendly web portal for effective and efficient communications management.
2. Requirements to setup ICTContact:
Server Specs:
- Quad Core 3 GHZ
- RAM 4GB
- Hard disk 200 GB
Operating System:
- Redhat 9.x
- RockyLinux 9.x
- CentOS 9.x
- Docker
- RockyLinux 8.x
- Redhat 8.x
- CentOS 8.x
3. To Login as admin:
- Once it is installed, open your Web browser
- Enter Domain Name or IP Address as URL in address bar.
- Login page will appear on screen with required fields.
- Enter User Name, Password in text boxes.
- Click on Login button as shown below:
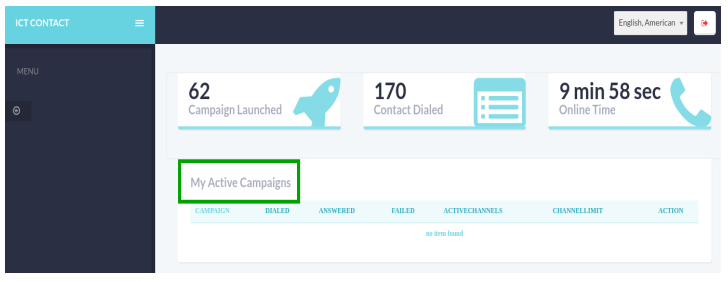
4. To Login as agent:
- Click on Agent Login button.
- Enter Entension and Password in text boxes.
- Click on Login button.
- A window container will displayed on screen that contain list of active campaigns as shown below:
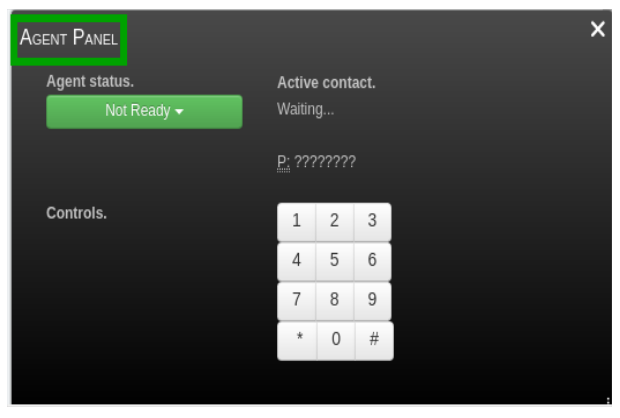
- A webphone is available on the Page for managing the following activities.
- To make call
- To transfer
- To make Inbound & Outbound calls
- To check agent status
5. Admin Panel:
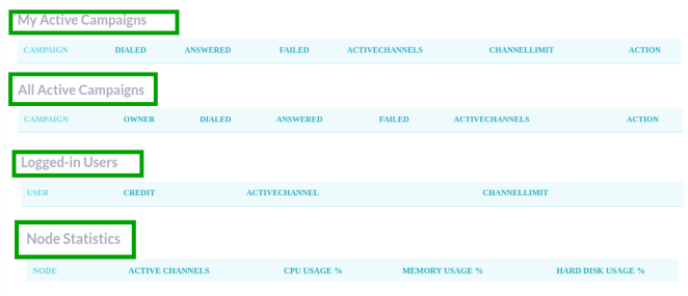
Main page will appear on screen that displayed Main Menu on left side and System & Server Status on right of the main page as shown below:

Scroll down the page that displayed campaigns status and details such as:
On top of main page, following button are available, on top of the page.
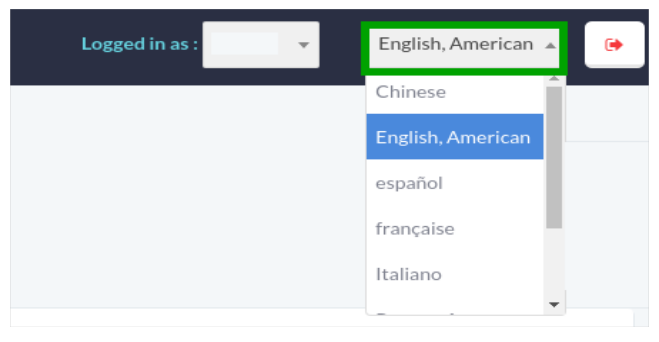
Click on Drop-Down button, a list will appear you can select language.
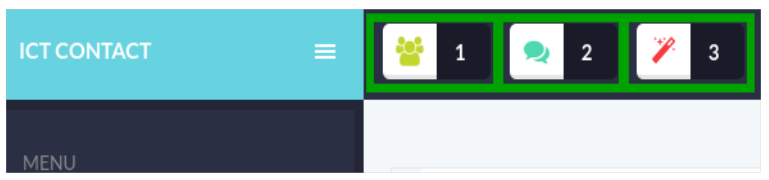
Click on blurbs on top of the page to directly access the specified options. They are listed below:
- Create Contact Group
- Upload Voice Recording
- Launch New Campaign
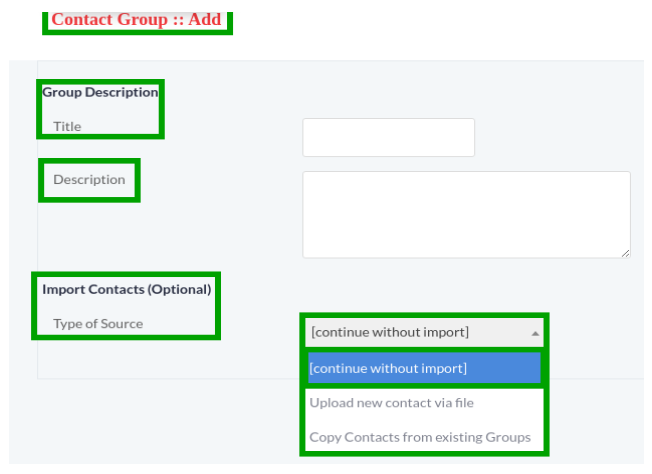
6. Create Contact Group:
Click on Create Contact Group button, a window form will appear on screen that contains required fields to add new contact group such as:
Group Description:
- Write Contact Group title the text box
- Write Contact Group description in the text box if any
Import Contacts(Optional):
Click on drop-down button, following options will display in the list.
Select Contact Without Import option to continue.
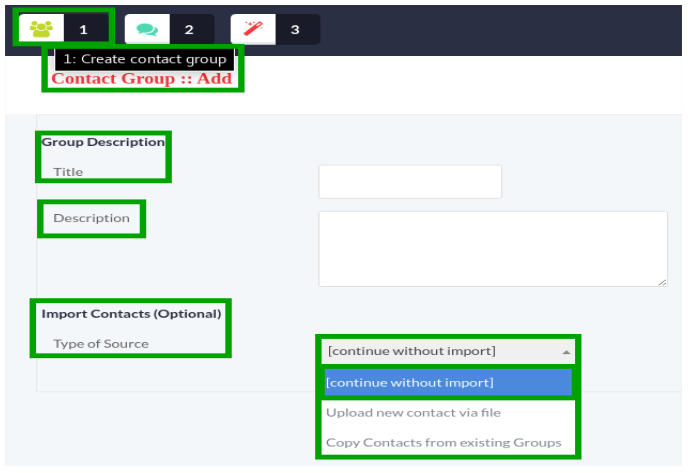
Select Upload New Contact File from list, upload contact file option will appear.
Click on Choose File button, a dialog box will appear on screen to select document.
Select Contact Group File from the system that need to upload as shown:
Select Copy Contacts from existing groups option to take existing contacts from groups as shown.
Click on Save button to save the settings
Click on Reset button to change the settings
Click on Cancel button to discard settings as shown:

7. To upload Voice Recording:
Click on Upload Voice Recording button, a window form will appear on screen that contain required fields, fill the specified fields such as:
Recording:
- Write name of recording in the text box.
- Write description of recording in the text box.
Message Source:
Click on Drop-Down button, select recording source from list.
Select Recording File option to upload file.
Click on Choose file button, a dialog box will appear on screen to select recording file from system.
Select Text option from list, a text container will appear to type text message as shown:
Click on Save button to save the settings
Click on Reset button to change the settings
Click on Cancel button to discard settings as shown:
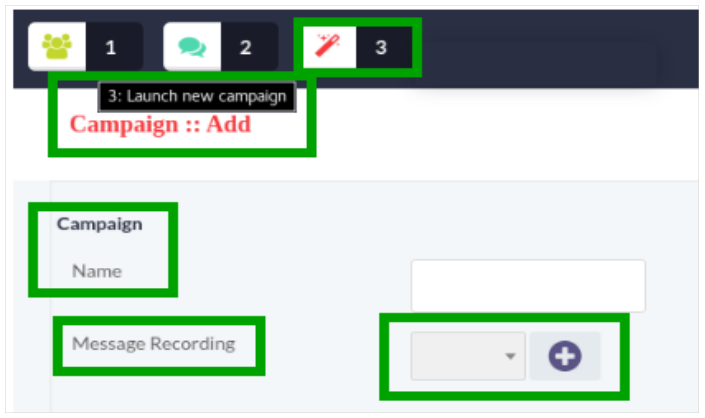
8. Launch New Campaign:
Click on Launch New campaign button, a window form will appear on screen that contain require fields, fill the specified fields such as:
Write Campaign Name in the text box.
Click on Plus icon to record your message as shown:
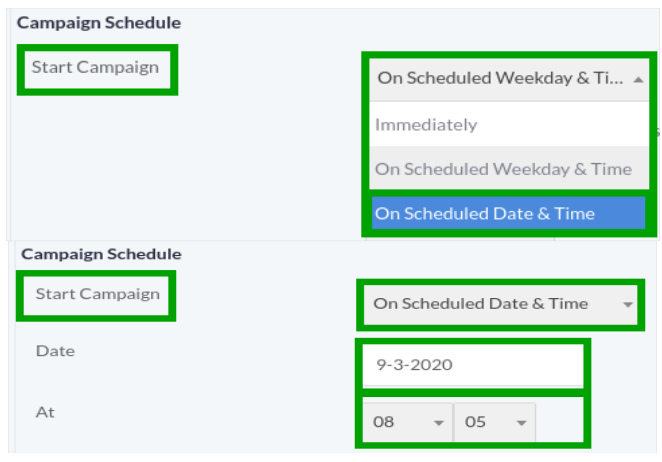
Campaign Schedule:
Click on Drop-Down button to select when to launch the campaign.
Select Immediately from the list to run the campaign immediately.

On Schedule Weekdays and Time:
Select On Scheduled Weekdays & Time option from list to run campaign on specific day and time.
Click on Check Boxes to specify the day and time to start campaign

On Schedule Date and Time:
Select On Schedule Date & Time option from list to run campaign on specific date.
Click on Date & Time Picker to set time and date to start campaign.
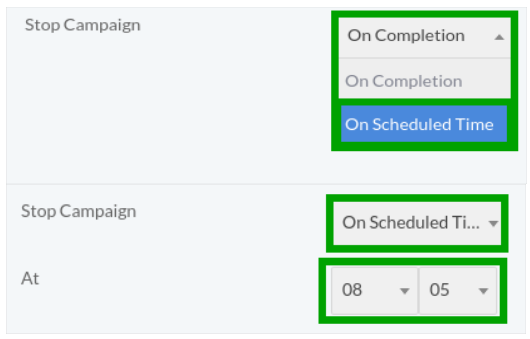
To Stop Campaign:
Click on Drop-Down button to select option from list when to stop campaign as shown:
Click on Save button to save the settings
Click on Reset button to change the settings
Click on Cancel button to discard settings as shown:
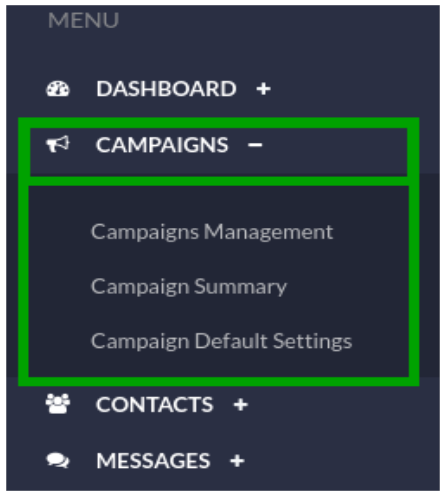
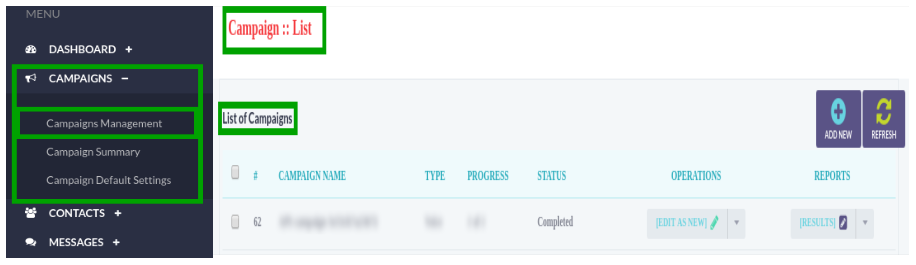
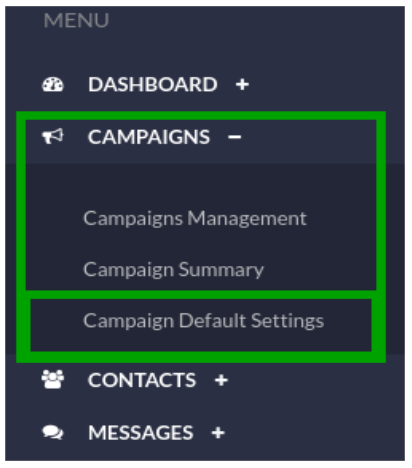
9. Campaigns:
Click on Campaign menu from main-menu, a list of sub-menus will appear on screen such as:
- Campaign Management
- Campaign Summary
- Campaign Default Settings
Campaign Management:
Click on Campaign Management menu, a window container will appear that contains a list of completed campaigns and details as shown below:
Click on Edit button, a window form will open on screen to change campaign information if required.
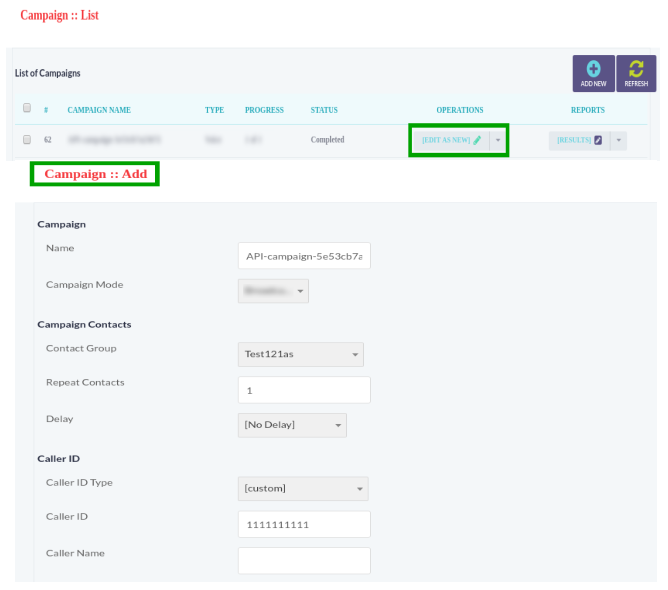
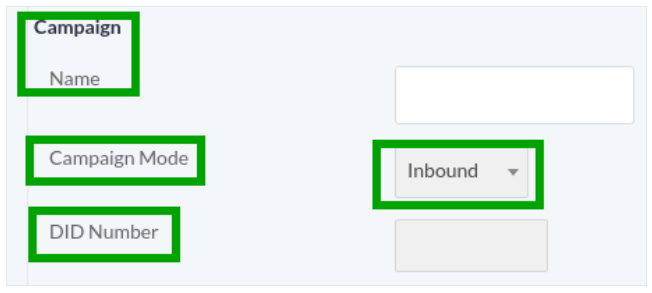
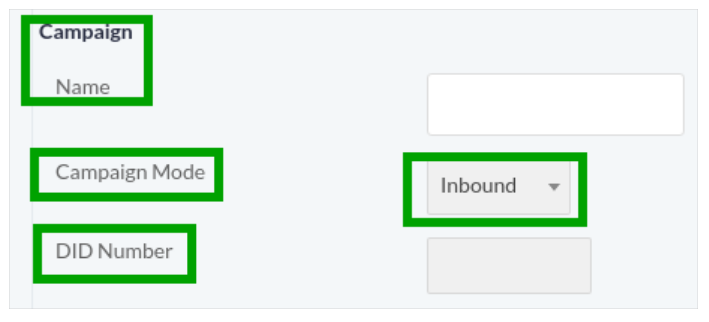
Campaign information:
- Write Campaign Name in the text box.
- Write DID number in the text box.
Click on Drop-Down button, a list of campaign modes will appear on page such as:
- To run inbound campaign
- To run outbound campaign
- To run dynamic campaign
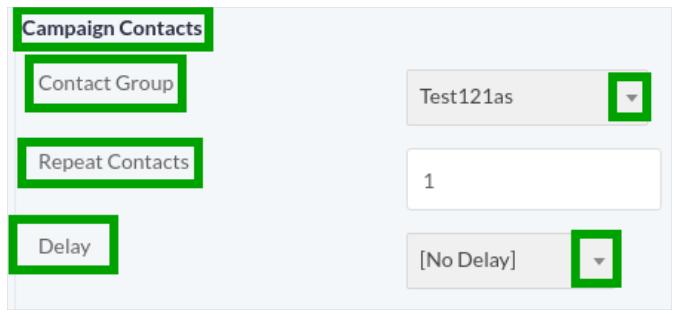
Campaign Contacts:
- Contact Group: Click on Drop-Down button to select contact group in list that being user in campaign.
- Repeat Contacts: Set amount of repeat contact in the text box.
- Delay: Click on Dro-Down button to set time for call delay if required.
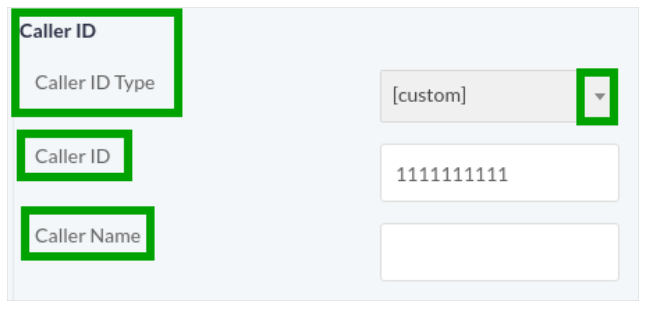
Caller ID Type:
Click on Drop-Down button, a list will appear on screen that contain following options to enter type of Caller I in list such as:
- User Caller ID
- Anonymous Caller ID
- Custom Caller ID
- Random Caller List
- Sequential Caller ID list
- Caller ID: Type Caller ID in text box
- Caller Name: Write name of Caller in text box
General Options:
- Dialogue/Script: Click on Drop-Down button to choose the script
- Contact URL: Enter contact URL in text box.
Agent/Operator Extension:
Click on Drop-Down button, a list will appear on page that contain following options to select extension on which calls will be placed as shown below:
The extension may be forwarded to agents or external call center or any IVR system for further handling of call.
- Action on Answering Machine Detection (AMD):
Click on Drop-Down button, a list will appear on page that contain following
options such as: - Disabled: When disabled is selected it ignores answering machine.
- Hangup: When hangup is selected, it detects AMD if found then hang up the call otherwise continue normally.
- Leave Message: When leave message is selected, it detects AMD if found then play a different message and hangup, it has another field for message recorded for answering machine.

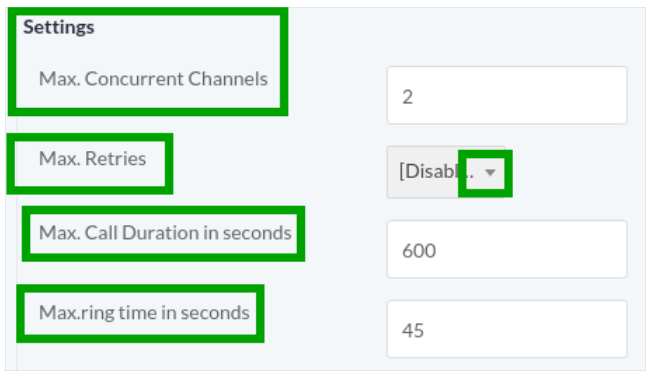
- Settings:
Write maximum number of concurrent channels in the text box that said campaign will support.
Click on Drop-Down button, select number of retries to contact the said contact.
Set maximum allowed duration for each call in the text box, after the duration call will be disconnect automatically. If user is not sure about duration of call let in be max number so that it does not effect call conversation.
Set amount of maximum ring time in seconds in text box.
- Campaign Schedule:
Click on Drop-Down button to select when to launch the campaign.
Select Immediately from the list to run the campaign immediately.
Select On Scheduled Weekdays & Time option from list to run campaign on specific day and time.
Click on Check Boxes to specify the day and time to start campaign
Select On Schedule Date & Time option from list to run campaign on specific date.
Click on Date & Time Picker to set time and date to start campaign.
To Stop Campaign:
Click on Drop-Down button to select option from list to stop campaign as shown:
Click on Save button to save the settings
Click on Reset button to change the settings
Click on Cancel button to discard settings as shown:
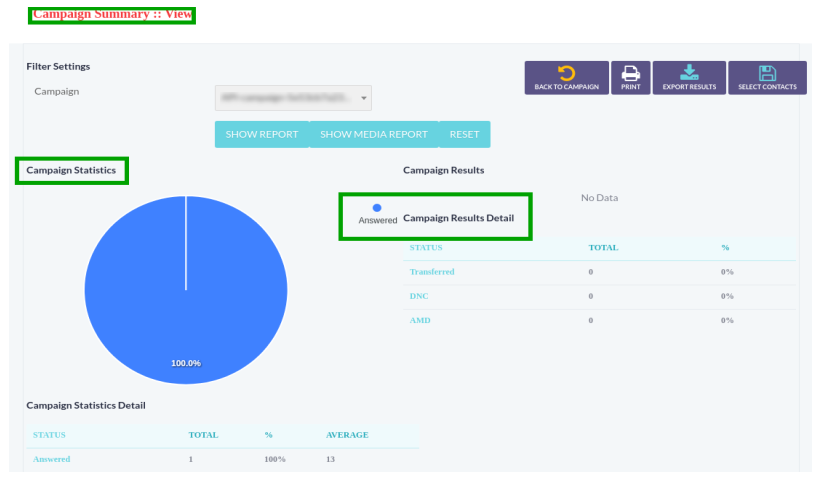
To View Campaign Summary:
Click on Results button to view campaign results, a window container will open onscreen that displayed how many calls answered and how many calls were failed then you should see campaign summary as shown below:
- Filer Settings:
- Campaign Statistics
- Campaign Results Detail
- Campaign Statistics Detail
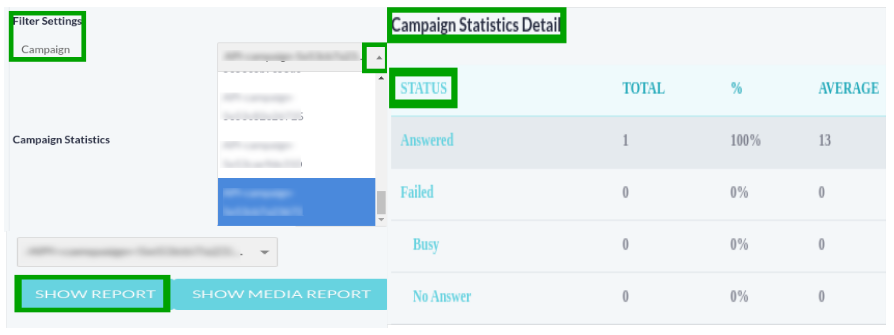
Filter Settings:
Click on Drop-Down button, a list will appear on page, following campaign names are categorized in the list.
Select the campaign from the list which needs to filter out for the details.
Click on Show Report button, selected campaign detail and result table will be shown on page:
To Check Media Report:
Click on Show Media Report button, a window form will appear on screen with required number, fill the specified fields.
Click on Filter Calls button as shown below:
Click on Reset button to reset the detail on page:

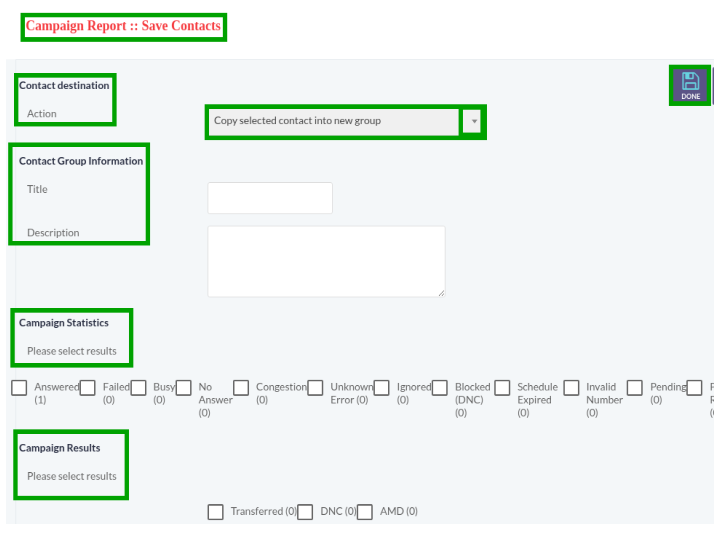
Click on Select Contacts button, a window form will appear on screen with required fields such as:
Contact Destination:
Click on Select Contacts button, a window form will appear on screen with required fields.
Click on Drop-Down button to select contact destination, a list of
multiple option will appear on page such as:
Copy Selected Contact into New Group
- Create New Campaign Using Selected Contact
- Mark Select Contact as Pending (Retry in Same Campaign)
Contact Group Information:
- Title: Write the title of contact group in the text box.
- Description: Write the description of contact group in the text box.
Campaign Statistics:
Select Check-Boxes to view the selected results of the campaign.
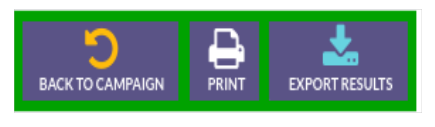
Click on Export button to export campaign report.
Click on Print button to print of report summary.
Click on Back to Campaign button to go back to campaign list.
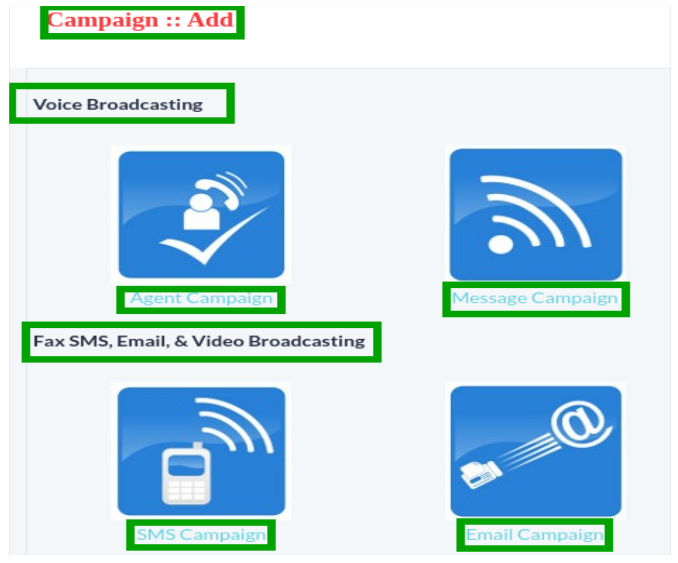
Add New Campaign:
Click on Add New button on top of the page, a window container will open on screen that displayed following options to select the type of campaign such as:
Voice Broadcasting:
- Agent Campaign
- Message Campaign
Fax SMS, Email and Video Broadcasting:
- SMS Campaign
- Email Campaign
Agent Campaign:
Click on Agent Campaign button to create agent campaign, a window form will appear on screen that contains required fields, fill the specified fields such as:
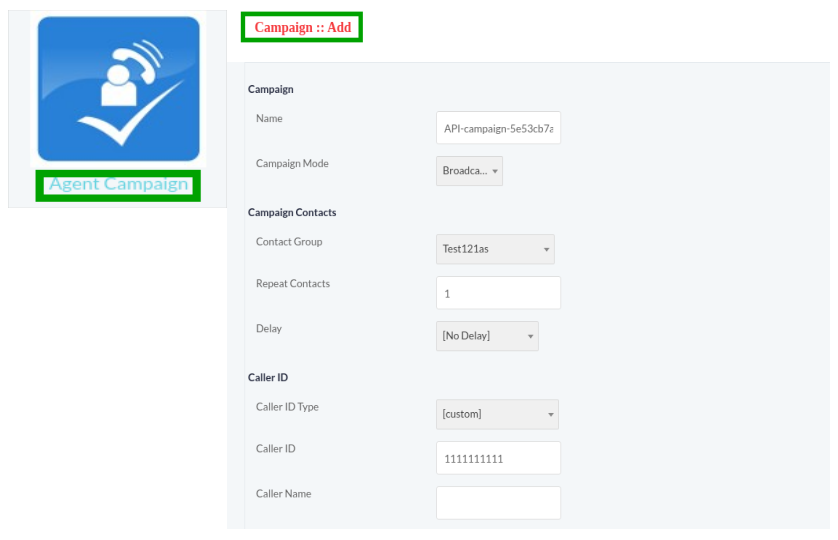
Campaign information:
-Write Campaign Name in the text box.
Click on Drop-Down button, a list of campaign modes will appear on page such as:
- To run inbound campaign
- To run outbound campaign
- To run dynamic campaign
Campaign Contacts
- Contact Group:Click on Drop-Down button to select contact group in list that being user in campaign.
- Repeat Contacts: Set amount of repeat contact in the text box.
- Delay: Click on Drop-Down button to set time for call delay if required.
Caller ID Type:
Click on Drop-Down button, a list will appear on screen that contain following options to enter type of Caller ID in list such as:
- User Caller ID
- Anonymous Caller ID
- Custom Caller ID
- Random Caller List
- Sequential Caller ID list
- Caller ID: Type Caller ID in text box
- Caller Name: Write name of Caller in text box
General Options:
- Dialogue/Script: Click on Drop-Down button to choose the script
- Contact URL: Enter contact URL in text box.
Agent/Operator Extension:
Click on Drop-Down button, a list will appear on page that contain following
options to select extension on which calls will be placed as shown below:
The extension may be forwarded to agents or external call center or any IVR system for further handling of call.
Action on Answering Machine Detection (AMD):
Click on Drop-Down button, a list will appear on page that contain following
options such as:
Disabled: When disabled is selected it ignores answering machine.
Hangup: When hangup is selected, it detects AMD if found then hang up the call otherwise continue normally.
Leave Message: When leave message is selected, it detects AMD if found then play a different message and hangup, it has another field for message recorded for answering machine.
Max concurrent channels:
Write maximum number of concurrent channels in the text box that said campaign will support.
Max Retries:
Click on Drop-Down button, a list will appear that contains numbers.
Maximum Call Duration:
Set maximum allowed duration for each call in the text box, after the duration call will be disconnect automatically. If user is not sure about duration of call let in be max number so that it does not effect call conversation.
Campaign Schedule:
- Click on Drop-Down button to select when to launch the campaign.
- Select Immediately from the list to run the campaign immediately.

- Select On Scheduled Weekdays & Time option from list to run campaign on specific day and time.
- Click on Check Boxes to specify the day and time to start campaign
- Select On Schedule Date & Time option from list to run campaign on specific date.
- Click on Date & Time Picker to set time and date to start campaign.
To Stop Campaign:
Click on Drop-Down button to select option from list to stop campaign as shown:
- Click on Save button to save the settings
- Click on Reset button to change the settings
- Click on Cancel button to discard settings as shown:
Message Campaign:
Click on Message Campaign button to create message campaign, a window form will appear on screen that contains required fields, fill the required fields such as:
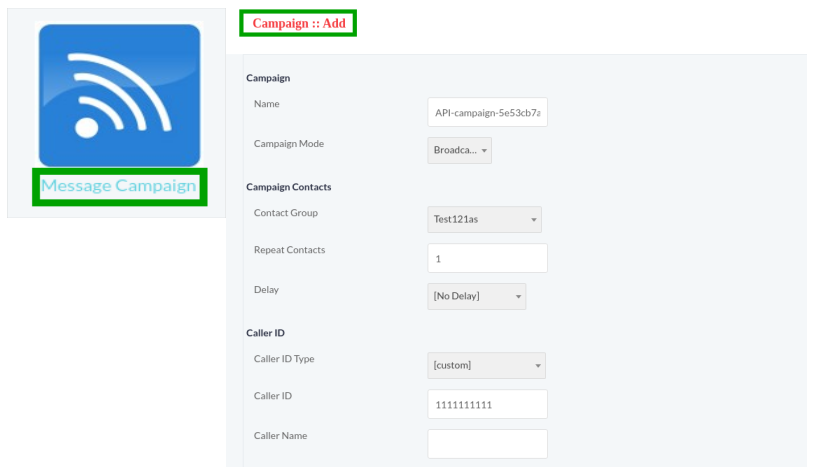
Write Campaign Name in the text box.
Click on Drop-Down button, a list of campaign modes will appear on page such as:
- To run inbound campaign
- To run outbound campaign
- To run dynamic campaign
Contact Group: Click on Drop-Down button to select contact group in list that being user in campaign
Repeat Contacts: Set amount of repeat contact in the text box.
Delay: Click on Drop-Down button to set time for call delay if required
Caller ID Type:
Click on Drop-Down button, a list will appear on screen that contain following options to enter type of Caller ID in list such as:
- User Caller ID
- Anonymous Caller ID
- Custom Caller ID
- Random Caller List
- Sequential Caller ID list
- Caller ID: Type Caller ID in text box
- Caller Name: Write name of Caller in text box
General Options:
Introductory Message: Click on Drop-Down button to select introductory message or let it disabled.
Action on DNC: Click on Drop-Down button to select action on DNC or let it disabled.
Action on Answering Machine Detection (AMD):
Click on Drop-Down button, a list will appear on page that contain following
options such as:
Disabled: When disabled is selected it ignores answering machine.
Hangup: When hangup is selected, it detects AMD if found then hang up the call otherwise continue normally.
Leave Message: When leave message is selected, it detects AMD if found then play a different message and hangup, it has another field for message recorded for answering machine.
Settings:
Max concurrent channels:
Write maximum number of concurrent channels in the text box that said campaign will support.
Max Retries:
Click on Drop-Down button, a list will appear that contains numbers.
Maximum Call Duration:
Set maximum allowed duration for each call in the text box, after the duration call will be disconnect automatically. If user is not sure about duration of call let in be max number so that it does not effect call conversation.
Campaign Schedule:
Click on Drop-Down button to select when to launch the campaign.
Select Immediately from the list to run the campaign immediately.

Select On Scheduled Weekdays & Time option from list to run campaign on specific day and time.
Click on Check Boxes to specify the day and time to start campaign
Select On Schedule Date & Time option from list to run campaign on specific date.
Click on Date & Time Picker to set time and date to start campaign.
To Stop Campaign:
Click on Drop-Down button to select option from list to stop campaign as shown:
Click on Save button to save the settings
Click on Reset button to change the settings
Click on Cancel button to discard settings as shown:
SMS Campaign:
Click on SMS Campaign button to create SMS campaign, a window form will appear on screen that contains required fields, fill the required fields such as:
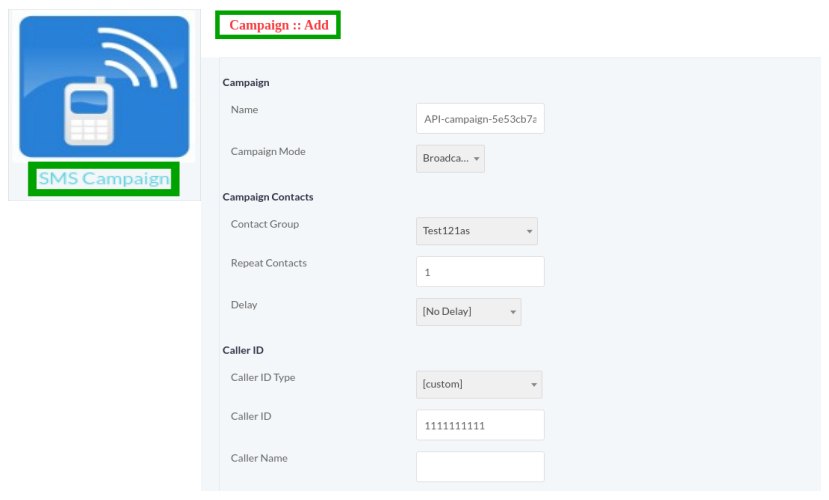
Write Campaign Name in the text box.
Click on Drop-Down button, a list of campaign modes will appear on page such as:
- To run inbound campaign
- To run outbound campaign
- To run dynamic campaign
Contact Group: Click on Drop-Down button to select contact group in list that being user in campaign
Repeat Contacts: Set amount of repeat contact in the text box.
Delay: Click on Dro-Down button to set time for call delay if required
Caller ID Type:
Click on Drop-Down button, a list will appear on screen that contain following options to enter type of Caller ID in list such as:
- User Caller ID
- Anonymous Caller ID
- Custom Caller ID
- Random Caller List
- Sequential Caller ID list
- Caller ID: Type Caller ID in text box
- Caller Name: Write name of Caller in text box
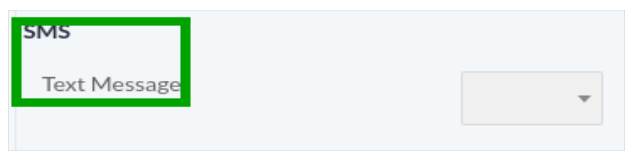
SMS: Select Text Message from Drop-Down list that will be used in campaign.
Campaign Schedule:
Click on Drop-Down button to select when to launch the campaign.
Select Immediately from the list to run the campaign immediately.
Select On Scheduled Weekdays & Time option from list to run campaign on specific day and time.
Click on Check Boxes to specify the day and time to start campaign
Select On Schedule Date & Time option from list to run campaign on specific date.
Click on Date & Time Picker to set time and date to start campaign.
To Stop Campaign:
Click on Drop-Down button to select option from list to stop campaign as shown:
Click on Save button to save the settings
Click on Reset button to change the settings
Click on Cancel button to discard settings as shown:
Email Campaign:
Click on Email Campaign button to create Email Campaign, a window form will appear on screen that contains required fields, fill the specified fields such as:
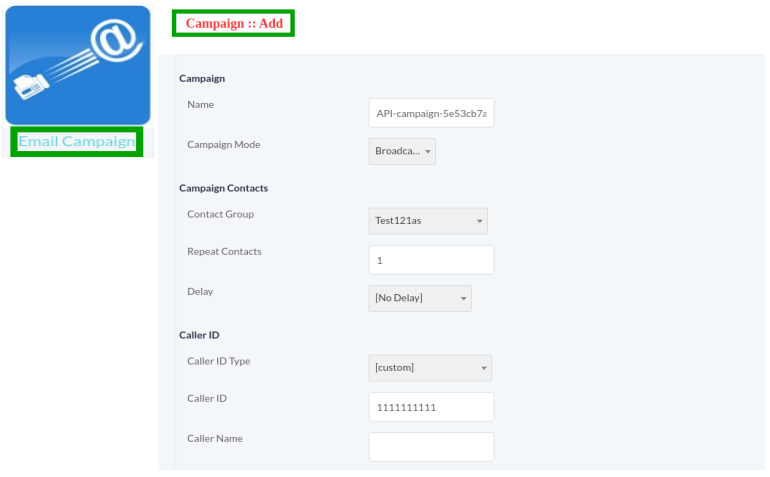
Write Campaign Name in the text box.
Click on Drop-Down button, a list of campaign modes will appear on page such as:
- To run inbound campaign
- To run outbound campaign
- To run dynamic campaign
Contact Group: Click on Drop-Down button to select contact group in list that being user in campaign
Repeat Contacts: Set amount of repeat contact in the text box.
Delay: Click on Drop-Down button to set time for call delay if required
Caller ID Type:
Click on Drop-Down button, a list will appear on screen that contain following options to enter type of Caller ID in list such as:
- User Caller ID
- Anonymous Caller ID
- Custom Caller ID
- Random Caller List
- Sequential Caller ID list
- Caller ID: Type Caller ID in text box
- Caller Name: Write name of Caller in text box
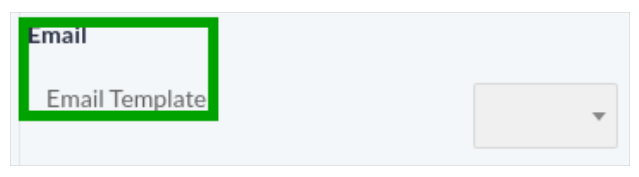
Email: Select Email Template from Drop-Down list which will be used in campaign.
Campaign Schedule:
Click on Drop-Down button to select when to launch the campaign.
Select Immediately from the list to run the campaign immediately.
Select On Scheduled Weekdays & Time option from list to run campaign on specific day and time.
Click on Check Boxes to specify the day and time to start campaign
Select On Schedule Date & Time option from list to run campaign on specific date.
Click on Date & Time Picker to set time and date to start campaign.
To Stop Campaign:
Click on Drop-Down button to select option from list to stop campaign as shown:
Click on Save button to save the settings
Click on Reset button to change the settings
Click on Cancel button to discard settings as shown:
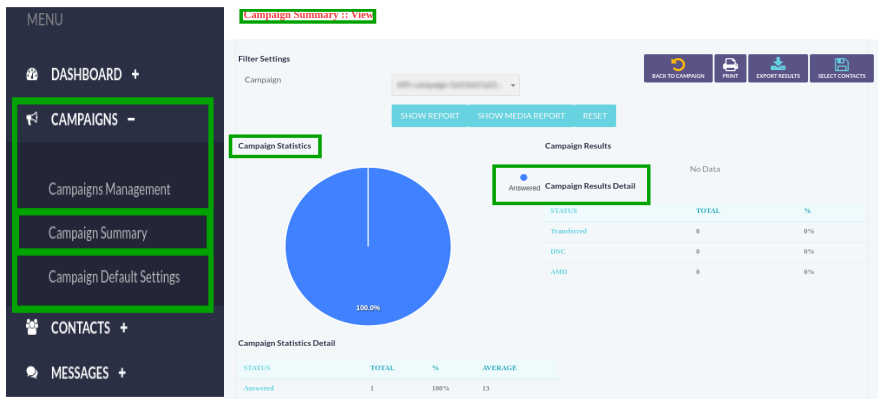
Campaign Summary:
Click on Campaign Summary menu button from main menu to view campaign
results, a window container will open on screen that displayed how many calls
answered and how many calls were failed then you should see campaign
summary as shown below:
- Filter Settings
- Campaign Statistics
- Campaign Results Detail
- Campaign Statistics Detail
Filter Settings:
Click on Drop-Down button, a list will appear on page, following campaign names are categorized in the list.
Select the campaign from the list which needs to filter out for the details.
Click on Show Report button, selected campaign detail and result table will be shown on page:
To Check Media Report:
Click on Show Media Report button, a window form will appear on screen with required number, fill the specified fields.
Click on Filter Calls button as shown below:
Click on Reset button to reset the detail on page:
Click on Select Contacts button, a window form will appear on screen with required fields such as:
Contact Destination:
Click on Drop-Down button to select contact destination, a list of multiple option will appear on page such as:
- Copy Selected Contact into New Group
- Create New Campaign Using Selected Contact
- Mark Select Contact as Pending (Retry in Same Campaign)
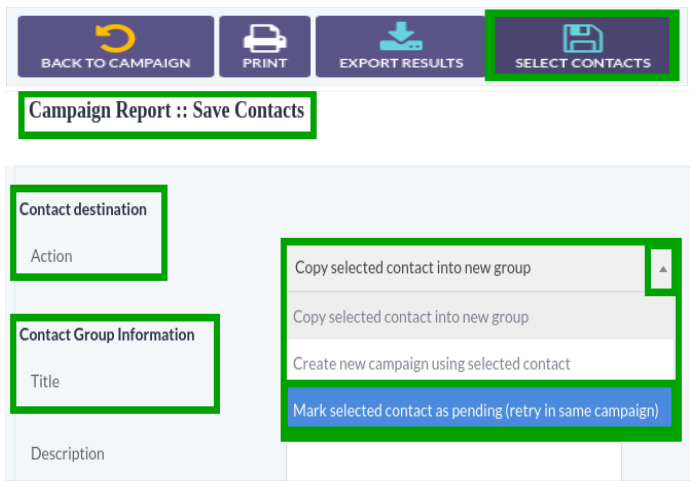
Contact Group Information:
Title: Write the title of contact group in the text box.
Description: Write the description of contact group in the text box.
Campaign Statistics:
Click on Check-Boxes to view the selected campaign results.
Click on Export button to export campaign report.
Click on Print button to print of report summary.
Click on Back to Campaign button to go back to campaign list.
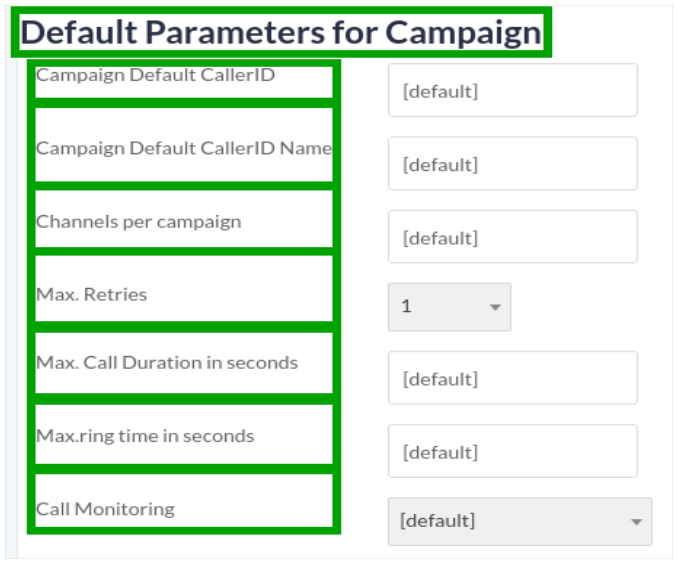
Campaign Default Settings:
Click on Campaign Default Settings menu button from menu, a window form will appear on screen that contains required fields, fill the specified such as:
Basic Campaign Configurations:
- Key Press Timeout: Set maximum key press time in text box to wait for user to allow him to press his desired key:
- DNC key: Click on Drop-Down button, a list of digits will appear, select one digit as a key to use as DNC key:
- Global DNC Group: Click on Drop-Down button, a list of multiple
options will appear such as:
Select Disable, no action will be taken.
Select Enable, to activate global DNC group.
Message Reply Key: Click on Drop-Down, a list of digits will appears on page, select one digit as a key to use for message reply.
Auto message Reply: Click on Drop-Down button, a list of multiple options will appear such as:
Select Disable for no action.
Select Enable to activate auto message reply.
Max Message Play:
To write number in text box, after this number of repeat tries current IVR message will be skipped.
Block Call Phone:
Click on Drop-Down button, a list of multiple options will appear such as:
Select Disable, for no action.
Select Enable, to activate block cell phone.

Default Parameters for campaign:
Campaign Default Caller ID: Use Default as caller ID in text box:
Campaign Default Caller ID Name: Use Default as Caller Name in text box.
Channels Per Campaign: Use default for channels per Campaign:
Max. Retires: Click on Drop-Down button, a list of digits will appear on page, select on digit from list, it means max number of retries to contact the said contact:
Max. Call Duration in Seconds: Use Default for maximum number of seconds for each call:
Max. Ring Time in Seconds: Use Default for maximum ring time in seconds:
Call Monitoring: Click on Drop-Down button, a list will appear on page that contain following options such as:
- Default
- No Call Monitoring
- Record Call After Transfer
- Record Complete Call
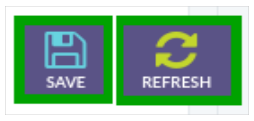
Click on Save button to save campaign settings:
Click on Refresh button to refresh the configuration:
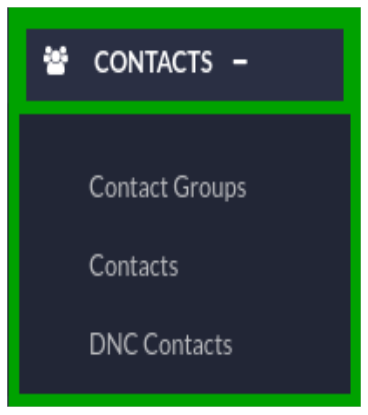
10. Contacts:
- Click on Contacts menu from main menu, following sub-menus will appear such as:
- Contact Groups
- Contacts
- DNC Contacts
Contact Groups:
Click on Contact Groups menu button, a window container will open on screen that contain list of all contact group as shown below:

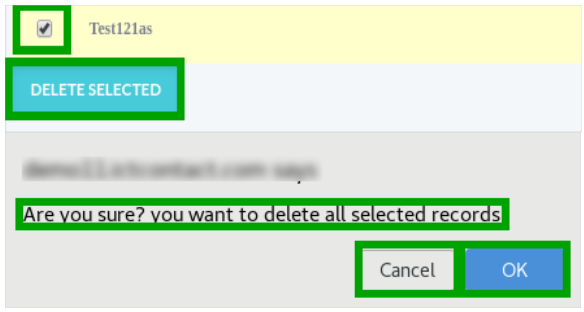
Click on check-boxes to select the contact from list.
Click the Delete Selected button to delete the selected record, a pop-up confirmation message will appear on top of the page.
Click on OK button to delete the record or click on Cancel button remain same changes.
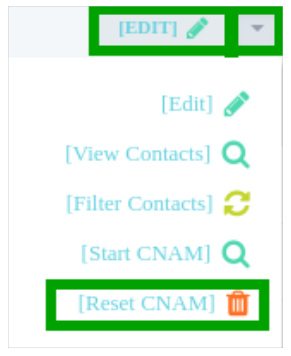
Click on Drop-Down Arrow button on right side of page, a list will that contain following options:
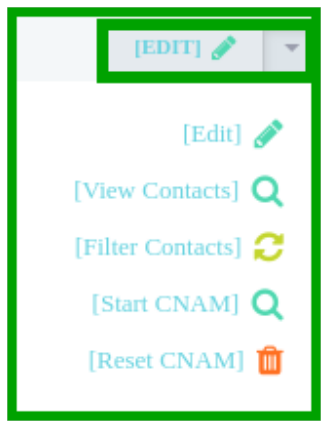
To Configure Contact Record:
Click on Edit button, a window form will appear on screen that
contained all configurable fields such as:
Group Description:
- Title: Write title of Contact Group in text box.
- Description: Write description of Contact Group in text box.
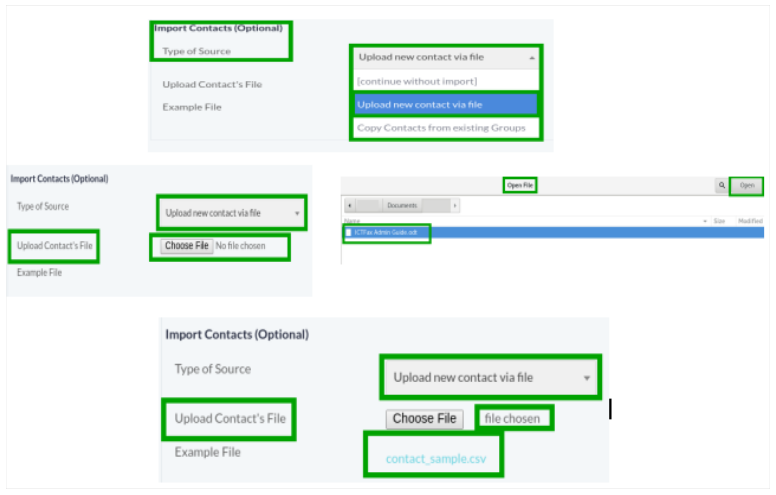
Import Contacts(Optional):
Click on drop-down button to select contact source type, a list of multiple options will appear on page, select Contact Without Import to continue without any source.
Select Upload New Contact via file from list, a command button will appear to upload a file.
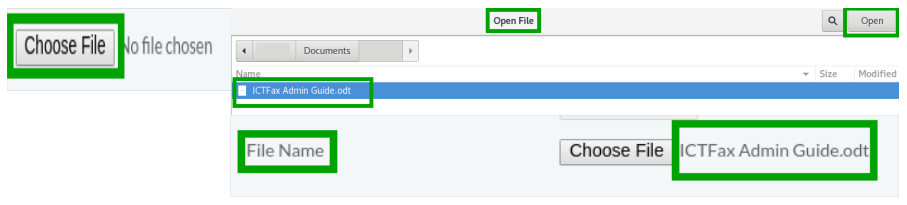
Click on Choose File command button, a dialog box will appear on screen to select document.
Navigate to the location of file on your computer.
Double clicking or select a file from location and click on Open button, file will be uploaded as shown below:
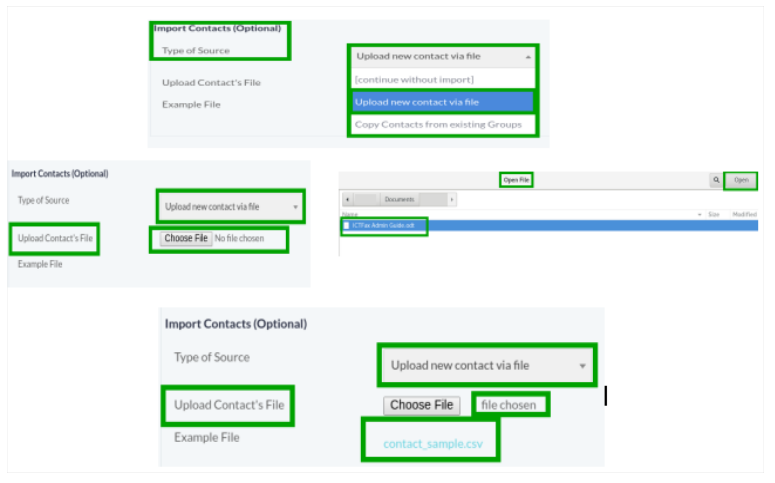
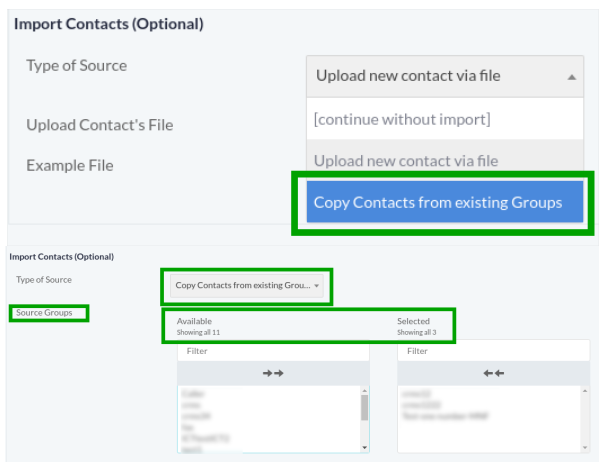
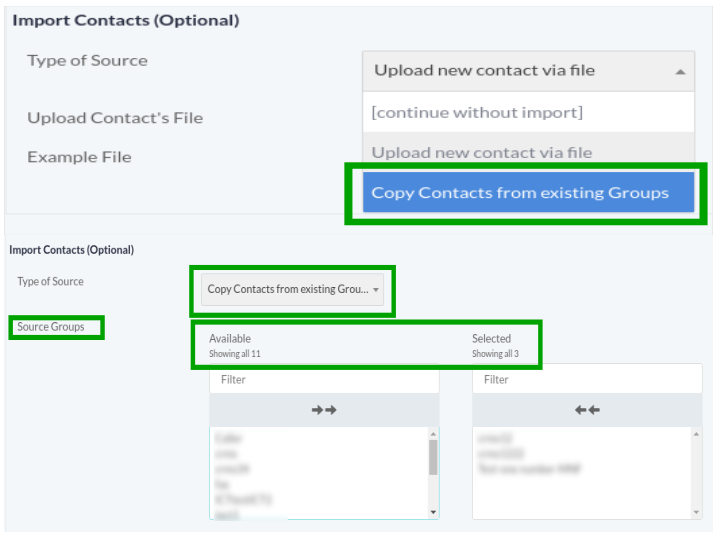
Select Copy Contacts from existing Group from list.
To select Source Group a pick list will will appear on page containing all existing.
You can select contacts from existing groups as shown below:

Click on Save button to save the settings.
Click on Arrow button to reset the settings.
Click on Cancel button to discard changes as shown below:
View Contact:
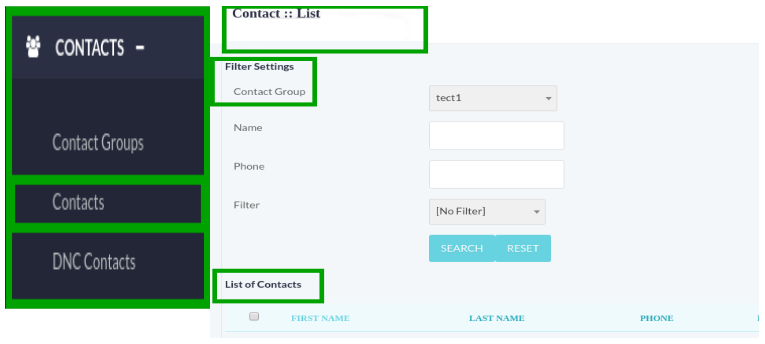
Click on View Contacts button from list, a window form will appear on screen that contains required fields, fill the specified fields such as:
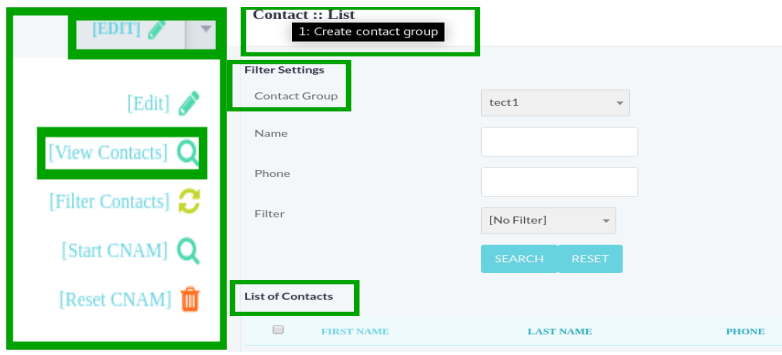
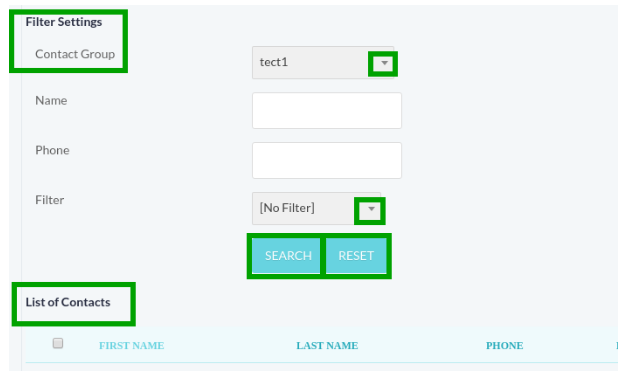
Filter Settings:
Contact Group: Click on Drop-Down button, a list will appear on
page that contain contact groups, select Contact Group from list.
Name: Write the name of user in the text box.
Phone: Enter the contact number in the text box:
Filer: Click on Drop-Down button, multiple options are available in
the list such as:
- No Filter
- Invalid Contact
- Duplicate Contacts
Select one option from list and click on Search button, list of filtered contacts will be shown below on page:
Click on Reset button to reset the settings:
Click on check-boxes to select the contact from list.
Click the Delete Selected button to delete the selected record, a pop-up confirmation message will appear on top of the page.
Click on OK button to delete the record or click on Cancel button remain same changes.
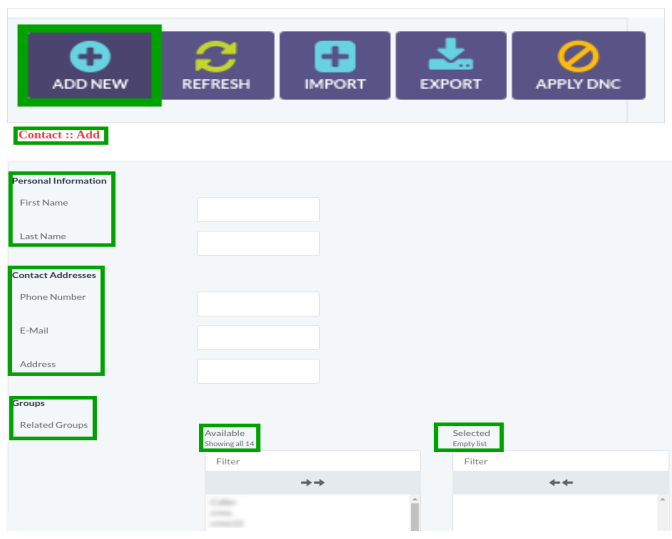
Add New Contact:
Click on Add New button, a window form will appear on screen that contains required fields to add new contact such as:
**Personal Information:****First Name:** Write First Name in text box.**Description:** Write Second Name in text box**Contact Addresses:****Phone Number:** Write Phone Number in text box.**E-Mail:** Write E-Mail Address in the text box.**Address:** Write Address in the text box.**Groups:** To select Related Group a pick list displayed on page containing all existing groups:You can select contacts from existing groups as shown below:
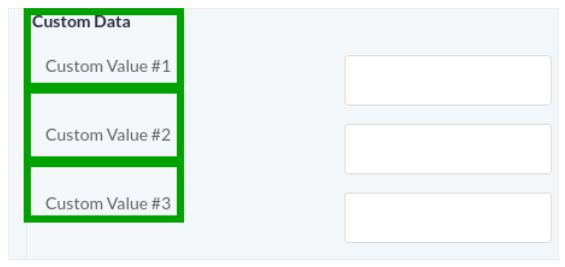
Custom data: Type custom value in the text boxes:
Comments/Description: Write comments in the text box:
Click on Save button to save the settings.
Click on Arrow button to reset the settings.
Click on Cancel button to discard changes as shown below:
Import Contacts Form:
Click on Import button, a window container will appear on screen that contain required fields, fill the specified fields such as:
Type of Source:
To select source, click on drop-down button, a list of multiple options will appear on page as shown below:
Select Upload New Contact via file from list, a command button will appear to upload a file.
Click on Choose File button, a dialog box will appear on screen to select document.
Navigate to the location of file on your computer.
Double clicking or select a file from location and click on Open button, file will be uploaded as shown below:
Select Copy Contacts from existing Group from list.
To select Source Group a pick list will will appear on page containing all existing.
You can select contacts from existing groups as shown below:
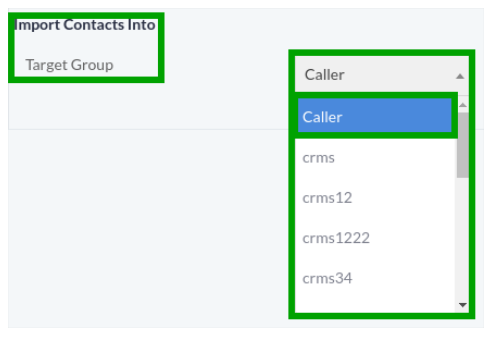
Import Contacts Into:
Target Group: Click on Drop-Down button to select the group.
Click on Save button to save the settings.
Click on Arrow button to reset the settings.
Click on Cancel button to discard changes as shown below:
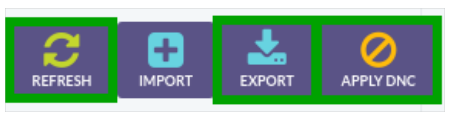
Click on Refresh button to refresh the contact list:
Click on Export button to export current report in comma-separated value (CSV).
Click on DNC button to apply DNC on contact to remove from campaign:
Click on Filter Contact from list, a window form will appear that contain required fields, fill the specified fields such as:
Contact Filer:
Phone Number: Select Phone Number from drop-down list:
E-Mail Address: Select Email Address from drop-down list:

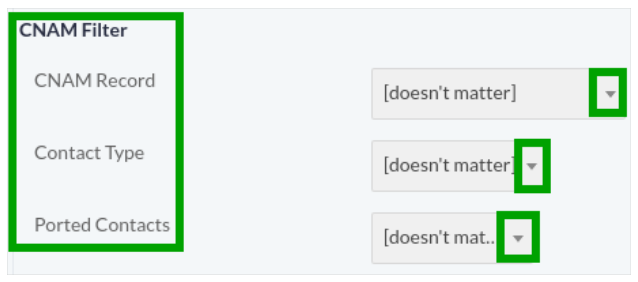
CNAM Filter:
CNAM Record: Click on Drop-Down button, a list will appear on page that contain following options such as:
- Doesn’t Matter
- Invalid or no CNAM record
- NO CNAM record
- Invalid record
Select one option from list as CNAM record as shown below:
Contact Type: Click on Drop-Down button, a list will appear on page that contain following options such as:
- Doesn’t Matter
- Land-line
- Wireless/Mobile
- Pager
- VOIP
- Other
Select one option from list as shown below:
Ported Contacts: Click on Drop-Down button, a list will appear on page that contain following options such as:
- Doesn’t Matter
- Ported
- Not Ported
Select one option from list as shown below:
Filter Contacts:
Do Not Call Registry (DNC): Click on Drop-Down button, a list will appear on page that contain following options, select one option from list as shown below:
Duplicate Contacts: Click on Drop-Down button, a list will appear on page that contain following options such as:
- Doesn’t Matter
- Duplicate Phone Number
- Duplicate Email Address
Select one option from list as shown below:
Which Copy of Duplicate: Click on Drop-Down button, a list will appear on page that contain following options, select one option from list as shown
below:

Click on Save button to save the settings.
Click on Arrow button to reset the settings.
Click on Cancel button to discard changes as shown below:
Click on Start CNAM button to start a process to create or update CNAM database for selected contact group:

Click on Reset CNAM button to drop all CNAM records associated with the selected contact group:
To Add New Campaign:
Move the cursor on top right side of page.
Click on Add New button to create new campaign, a window form with appear on screen that contain required fields, fill the specified fields
such as:
Group Description:
Title: Write title of Contact Group in text box.
Description: Write description of Contact Group in text box
Import Contacts(Optional):
Type of Source: To select source, click on drop-down button, a list of multiple options will appear on page, select Contact Without Import to continue without any source.
Select Upload New Contact via file from list, a command button will appear to upload a file.
Click on Choose File command button, a dialog box will appear on screen to select document.
Navigate to the location of file on your computer.
Double clicking or select a file from location and click on Open button, file will be uploaded as shown below:
Select Copy Contacts from existing Group from list.
To select Source Group a pick list will will appear on page containing all existing.
You can select contacts from existing groups as shown below:
Click on Save button to save the settings.
Click on Arrow button to reset the settings.
Click on Cancel button to discard changes as shown below:
Contacts:
Click on Contacts menu button from menu, a window form will appear on screen that contains required fields, fill the required fields such as:
Filter Settings:
Click on Drop-Down button, a list will appear on page that contain contact
groups, select Contact Group from list.
Name: Write the name of user in the text box:
Phone: Enter the contact number in the text box:
Filer: Click on Drop-Down button, multiple options are available in the
list such as:
- No Filter
- Invalid Contact
- Duplicate Contacts
Select one option from list and click on Search button, list of filtered contacts will be shown below on page:
Click on Reset button to reset the settings:
Click on check-boxes to select the contact from list.
Click the Delete Selected button to delete the selected record, a pop-up confirmation message will appear on top of the page.
Click on OK button to delete the record or click on Cancel button remain same changes.
Add New Contact:
Click on Add New button, a window form will appear on screen that contains
required fields to add new contact such as:
Personal Information:
- First Name: Write First Namein text box.
- Description: Write Second Name in text box
Contact Addresses:
- Phone Number: Write Phone Number in text box.
- E-Mail: Write E-Mail Address in the text box.
- Address: Write Address in the text box.
- Groups: To select Related Group a pick list displayed on page containing all existing groups.
- You can select contacts from existing groups as shown below:
- Custom data: Type custom value in the text boxes:
- Comments/Description: Write comments in the text box:
Click on Save button to save the settings.
Click on Arrow button to reset the settings.
Click on Cancel button to discard changes as shown below:
Click on Import button, a window container will appear on screen that contain required fields, fill the specified fields such as:
Import Contacts Form:
Click on Import button, a window container will appear on screen that contain required fields, fill the specified fields such as:
Type of Source: To select source, click on drop-down button, a list of multiple options will appear on page as shown below:
Select Upload New Contact via file from list, a command button will appear to upload a file.
Click on Choose File command button, a dialog box will appear on screen to select document.
Navigate to the location of file on your computer.
Double clicking or select a file from location and click on Open button, file will be uploaded as shown below:
Select Copy Contacts from existing Group from list.
To select Source Group a pick list will will appear on page containing all existing.
You can select contacts from existing groups as shown below:
Import Contacts Into:
Target Group: Click on Drop-Down button to select the group:
Click on Save button to save the settings.
Click on Arrow button to reset the settings.
Click on Cancel button to discard changes as shown below:
Click on Refresh button to refresh the contact list:
Click on Export button to export current report in comma-separated value (CSV).
Click on DNC button to apply DNC on contact to remove from campaign:
DNC Contacts:
Click on DNC Contacts menu button from main menu, a window container will displayed on screen that contain list of DNC as shown below:
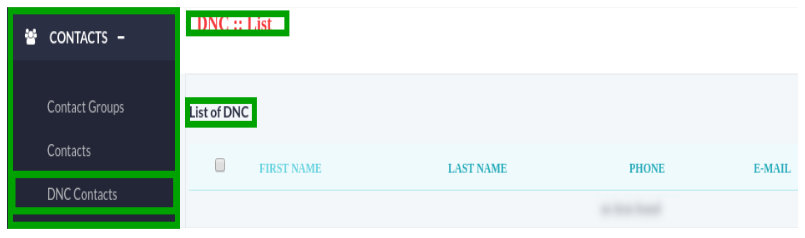
Click on check-boxes to select the contact from list.
Click the Delete Selected button to delete the selected record, a pop-up 4. confirmation message will appear on top of the page.
Click on OK button to delete the record or click on Cancel button remain same changes.
Add New DNC:
Click on Add New button on top of the page, a window form will appear that contain required fields, fill the specified fields such:
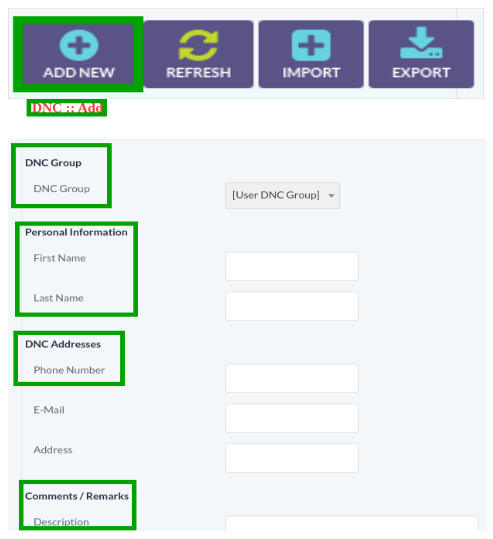
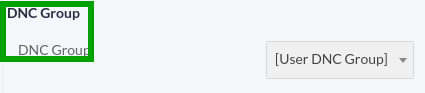
DNC Group:
Select DNC group, click on Drop-Down button, a list will appear that contain following options such as:
- User DNC Group
- Global DNC Group
Personal Information:
Type First Name & Last Name in text box.
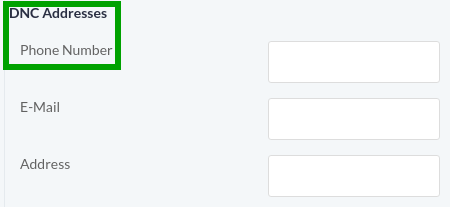
DNC Addresses:
Type Phone Number, E-Mail, Address in text box.
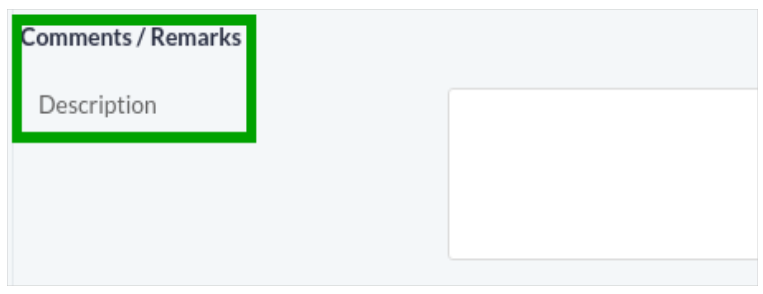
Comments/Remarks:
Description: Write description about DNC in the text box:

Click on Save button to save the settings.
Click on Arrow button to reset the settings.
Click on Cancel button to discard changes as shown below:
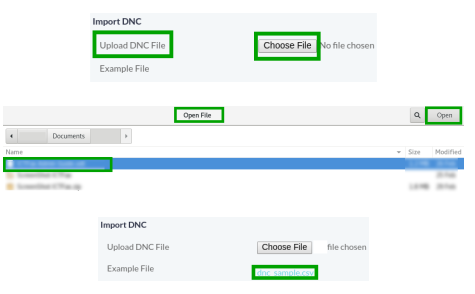
Click on Import button to import new DNC, a window form will appear on screen that required fields, fill the specified fields such as:
Import DNC:
Click on Choose File command button, a dialog box will appear on screen to select document.
Navigate to the location of file on your computer.
Double clicking or select a file from location and click on Open button, file will be uploaded as shown below:
Import into:
Click on Drop-Down button, a list will appear on page that contain following option, select any option to import DNC as shown below:

Click on Save button to save the settings.
Click on Arrow button to reset the settings.
Click on Cancel button to discard changes as shown below:
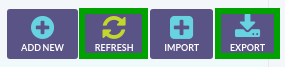
Click on Refresh button to refresh the DNC list:
Click on Export button to export current report in comma-separated values (CSV).
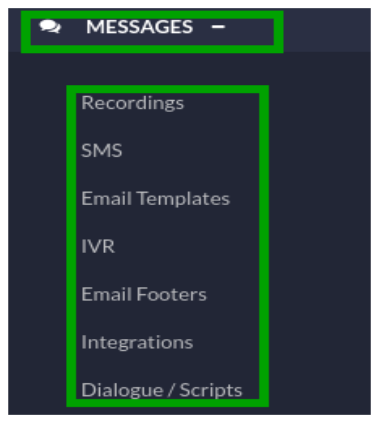
11. Messages:
Click on Messages menu from main menu, a list of sub-menus will display such as:
- Recordings
- SMS
- IVR
- E-Mail Footers
- Integrations
- Dialogue/Scripts
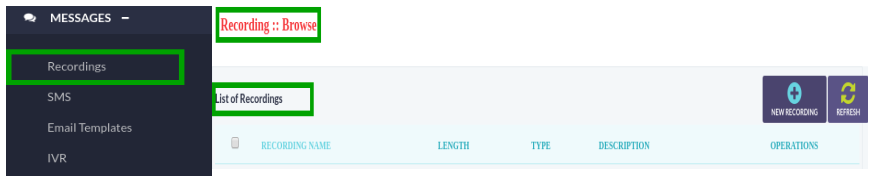
Recordings:
Click on Recordings menu button, a window container will appear on screen that contains list of recordings and details as shown below:
Click on check-boxes to select the contact from list.
Click the Delete Selected button to delete the selected record, a pop-up confirmation message will appear on top of the page.
Click on OK button to delete the record or click on Cancel button remain same changes.
To Add new Recording:
Move the cursor on New Recording on top right side of the page.
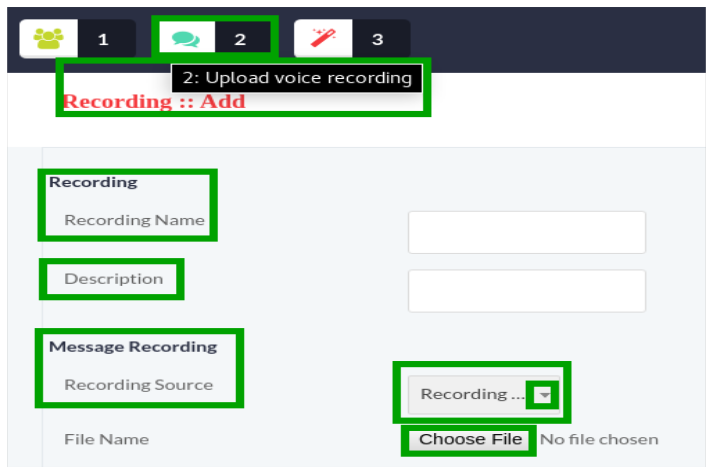
Click on New Recording button, a window form will appear on screen with required fields, fill the specified fields such as:
- Recording:
- Recording Name:
- Description:
- Message Recording:
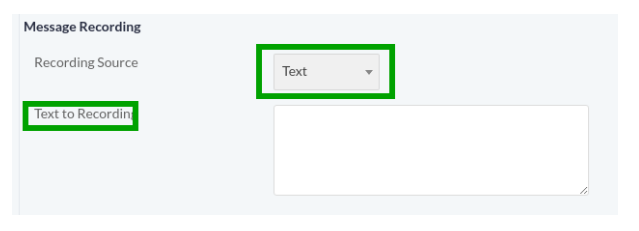
Recording Source:
Click the Drop-Down button to select recording source, a list appear on screen that contains couple of option is such as:
Select Recording File from list, a command button will appear on page to upload a file.
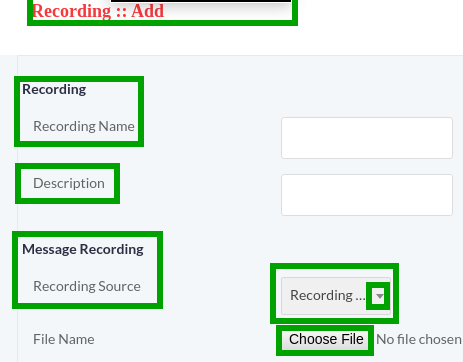
Click on Choose File button, a dialog box will appear on screen to select document.
Naivgate to the location of file on you computer.
Select file from location and lick on open button, file will be uploaded as shown below:
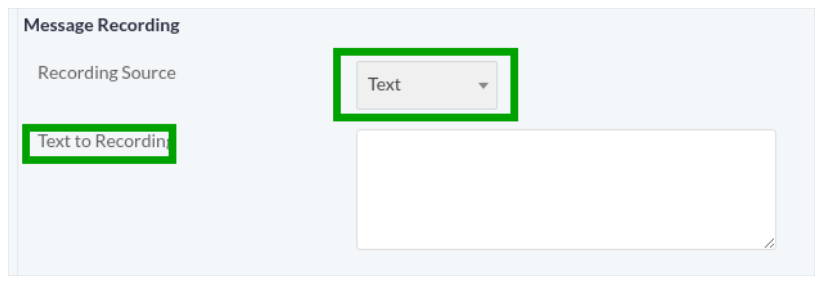
Select Text option from ilst, a Text to recording text container will appear on page as shown below:
Click on Save button to save the settings.
Click on Arrow button to reset the settings.
Click on Cancel button to discard the changes as shown below:
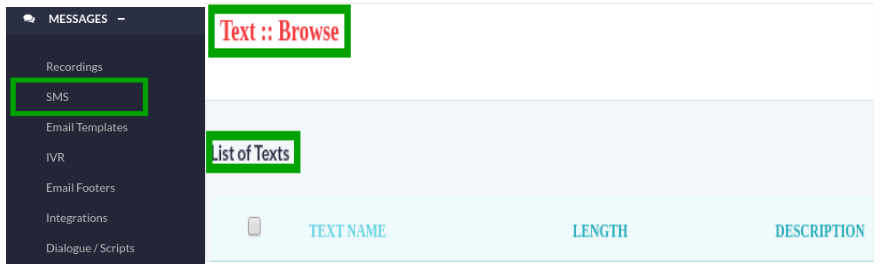
SMS:
Click on SMS menu button from main menu, a window container will appear on screen that contain list of texts as shown below:
Click on check-boxes to select the contact from list.
Click the Delete Selected button to delete the selected record, a pop-up confirmation message will appear on top of the page.
Click on OK button to delete the record or click on Cancel button remain same changes.
To Add New Text:
Move the cursor on Add Text on top right side of the page.
Click on Add Text button, a window form will appear on screen that contain required fields, fill the specified fields such as:
- Type text title in the text box.
- Type description in the text box.

SMS Message:
List of Tokens are available on the page.
User can use Tokens while creating on SMS. Tokens are useful when
customer specific information is required such as:
- Customers Name
- Customers Address
- Customers Email Address
Following pattern is allowed for using Tokens such as:
- [Contact’s First Name]
- [Contact’s Phone Number]
Whenever above pattern is used it means first name of contact will be replaced at this place. Similarly you can use all fields as Tokens. Following is a list of Tokens that can be used in SMS Messages as shown below:

Click on Save button to save the settings.
Click on Arrow button to reset the settings.
Click on Cancel button to discard changes as shown below:
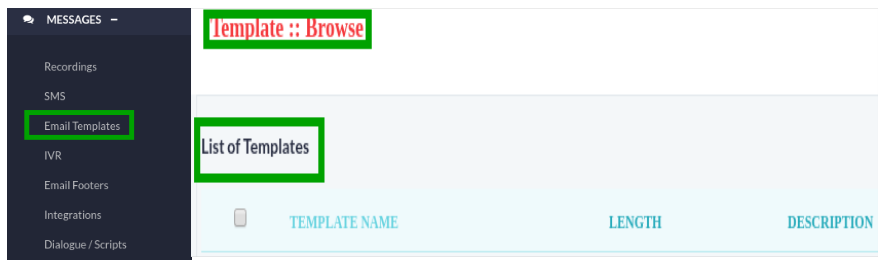
Email Templates:
Click on Email Templates menu button from main menu, a window container
will appear on screen that contain list of texts as shown below:
Click on check-boxes to select the contact from list.
Click the Delete Selected button to delete the selected record, a pop-up confirmation message will appear on top of the page.
Click on OK button to delete the record or click on Cancel button remain same changes.
To Add New Template:
Move the cursor on New Template on top right side of the page.
Click on New Template button, a window form will appear on screen that contain required fields. Email Template is a sample email that where user ca provide subject of the email, email body, alternate email body user custom tokens in place of receivers name and contact info etc.
Once Email Template is complete user can use it to send its contact list:

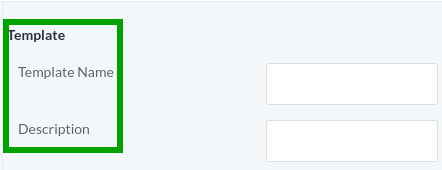
Template Name: Write the name of Template in the text box as it appear in the campaign form.
Description: Write description of Template in the text box:
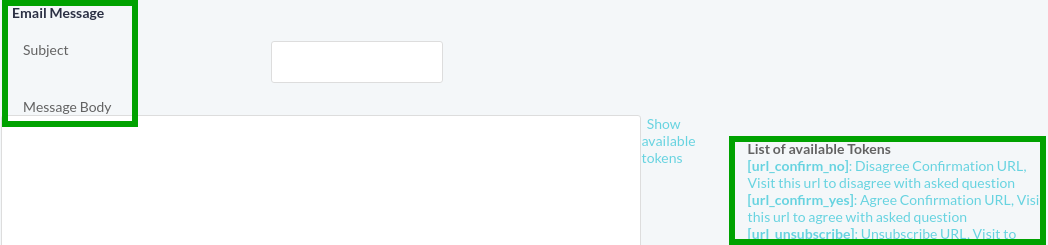
Email Message:
Subject: Subject line of the email that user needed.
Message Body: Write message in the Text box to send.
Alternate Message:
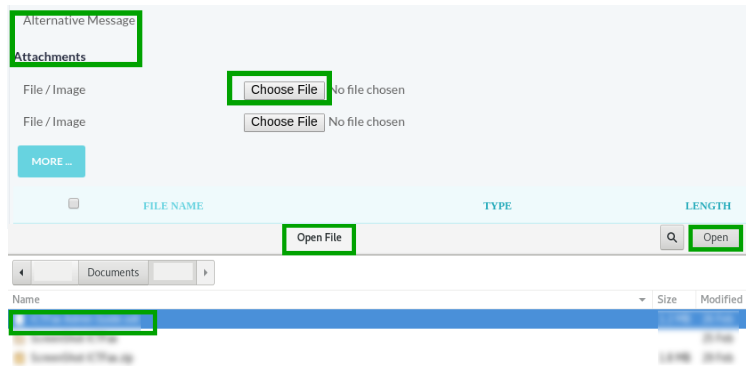
To attach a file/image, click on Choose File command button, a dialog box will appear on screen to select document.
Navigate to the location of file on your computer.
Double clicking or select a file from location and click on Open button, file will be uploaded as shown below:
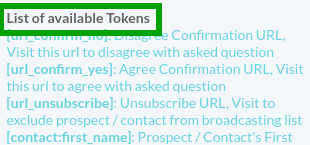
Using Tokens in Email Templates:
Tokens are useful when customer specific information is required, following pattern is allowed for using Tokens in email templates:
- [Contact First-Name]
- [Contact Phone Number]
Whenever above pattern is used it means first name of contact will be replaced at this place, following is a list of Tokens that can be used in Email Templates as shown below:
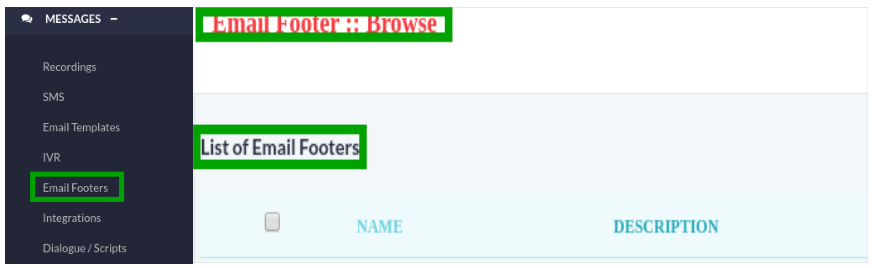
Email Footer:
Click on Email Footer menu button from main menu, a window container will appear on screen that contain list of texts as shown below:
Click on Check-Boxes to select the contact from list.
Click the Delete Selected button to delete the selected record, a pop-up confirmation message will appear on top of the page.
Click on ok button to confirm the action or click on Cancel button
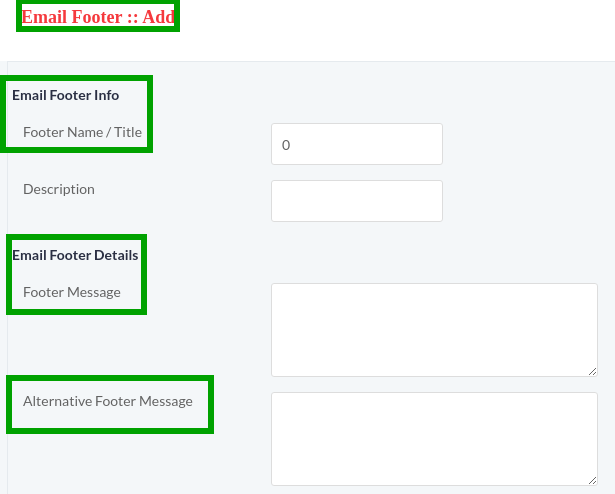
To Add New Email Footer:
Click on New Email Footer button, a window form will appear on screen that contain required fields, fill the specified fields such as:
- Email Footer Info
- Footer Name/Title
- Description
- Email Footer Details
- Footer Message
- Alternative Footer Message
Click on Save button to save the settings.
Click on Arrow button to reset the settings.
Click on Cancel button to discard changes as shown below:
Dialogue/Script:
Click on Dialogue/Script menu button from main menu, a window container will appear on screen that contain list of texts as shown below:
Click on Check-Boxes to select the dialogues from list.
Click the Delete Selected button to delete the selected record, a pop-up confirmation message will appear on top of the page.
Click on ok button to confirm the action or click on Cancel button.
To Add New Dialogue:
Click on Add Dialogue button on top of the page, a window form will appear on screen that contain required fields, fill the specified fields such as:
Dialogue Name: Type name of dialogue in text box.
Description: Type description in text
Agent Script: List of Tokens are available to make script for agent. Tokens are useful when customers specific information is needed such as:
- Customer Name
- Customer Address
- Customer Email Address etc
Following pattern is allowed for using Tokens such as:
- [Contact’s First Name]
- [Contact’s Phone Number]
Whenever above pattern is used it means first name of contact will be replaced at this place. Similarly you can use all fields as Tokens. Following is a list of Tokens that can be used in SMS Messages as shown below:
Click on Save button to save the settings.
Click on Arrow button to reset the settings.
Click on Cancel button to discard changes as shown below:
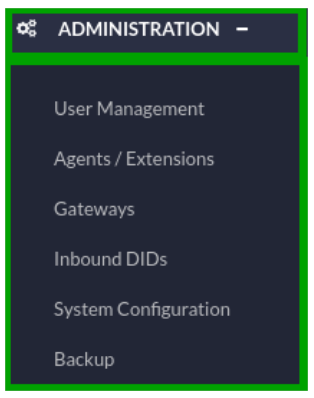
12. Administration:
Click on Administration menu from main menu, following sub-menus will display such as:
- User Management
- Agents/Extensions
- Gateways
- Inbound DID’s
- System Configuration
- Backup
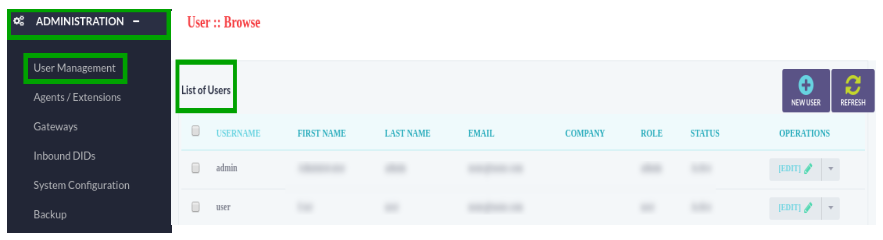
User Management:
Click on User Management from menu, a window container will appear on screen that contain list of users as shown below:
Click on Check-Boxes to select the users from list.
Click the Delete Selected button to delete the selected record, a pop-up confirmation message will appear on top of the page.
Click on ok button to confirm the action or click on Cancel button
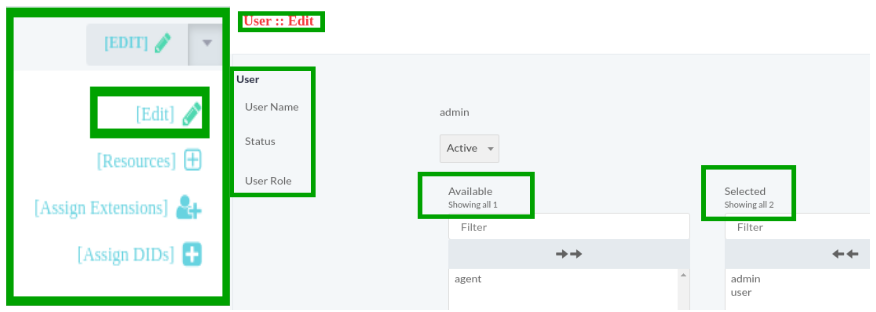
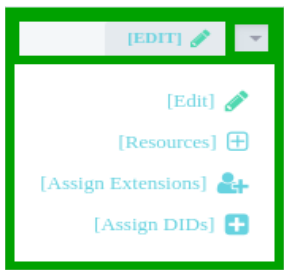
Click on Drop-Down button on right side of page, a list will appear that contain following options such as:
- Edit record
- Resources
- Assign Extensions
- Assign DID’s
Click on Edit button, a window form will appear on screen that contain required fields, fill the specified fields such as:
- User Name: Write name of user in text box.
- Status: Click on Drop-Down button, select active from list.
- User Role: To select Role a pick list will appear on page containing all
available roles. - Password: Set password and pin code
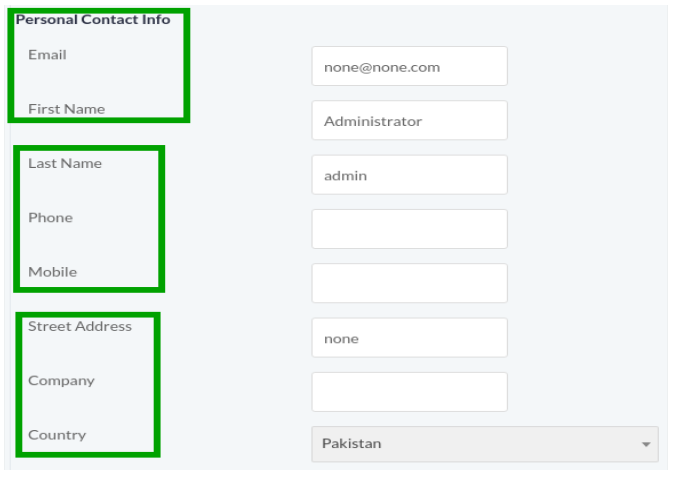
Personal Contact Info:
- Email:
- First & Last Name
- Phone
- Mobile
- Street Address
- Company
- Country
Click on Drop-Down list, Select Country name from list.
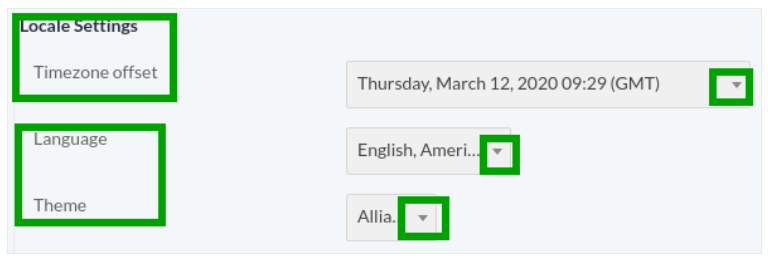
Locale Settings:
Timezone Offset: Click on Drop-Down list, Select Timezone from list.
Language: Click on Drop-Down list, Select suitable Language to understand from list.
Click on Save button to save the settings.
Click on Arrow button to reset the settings.
Click on Cancel button to discard changes as shown below:
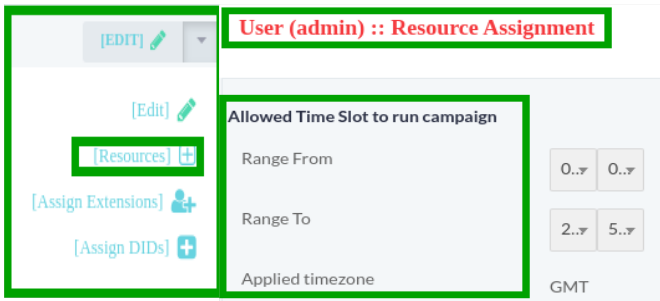
Resources:
Click on Resources button from list, a window form will appear on screen that contain required fields such as:
- Allowed Time Slot To Run Campaign
- Range From
- Range To
Click on Drop-Down button to set time to run campaign as shown below:
Allowed Weekdays:
To start campaign on Weekdays, select On scheduled Weekdays and time from list.
Following check box will appear on page, by click Check Boxes you can specify the days and set the time from pick list to start campaign as shown below:

Permissions:
Following check box are available on page, by clicking Check Boxes you can allow campaign type to start campaign as shown below:

Click on Save button to save the settings.
Click on Arrow button to reset the settings.
Click on Cancel button to discard changes as shown below:
Assign Extension:
Click on Assign Extension button from list, a window container will appear on screen that contain following options such as:
List of Assigned Extensions:
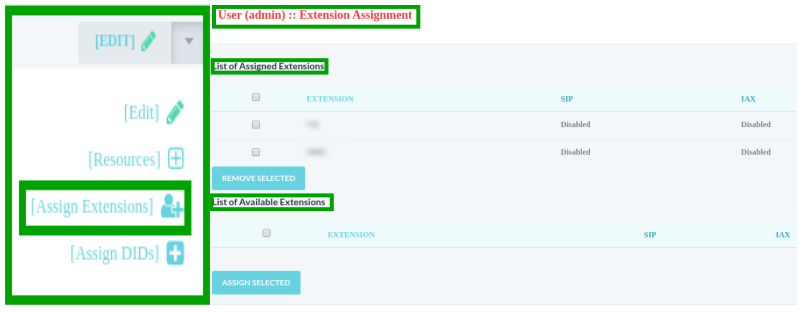
You can remove any record from list, click on check-boxes to select the extension.
Click the Remove Selected button to remove the selected record, a pop-up will appear on top of the page with confirmation message.
Click the OK button or click Cancel button to remain same changes.
List of Available Extensions:
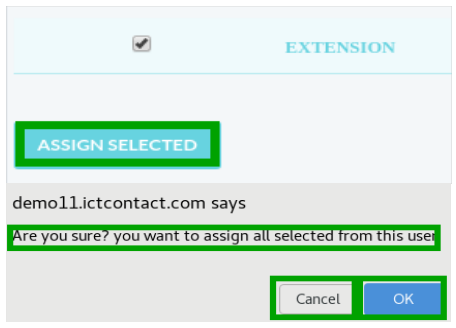
List of available extensions displayed, click on check-boxes to select the extension.
Click the Assign Selected button to assign the extension as shown below:
Click on Refresh button to refresh the extension list:
Click on Cancel button to discard changes and show user list:
Assign DIDs:
Click on Assign DID’s button from list, a window container will appear on screen that contain following options such as:
- List of Assigned DID’s
- List of Available DID’s
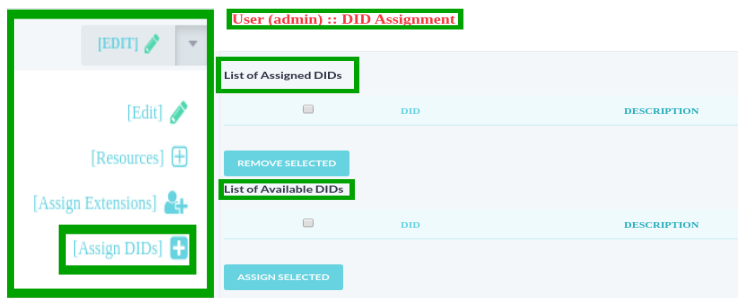
You can remove any record from list, click on check-boxes to select the record.
Click the Remove Selected button to remove the selected record, a pop-up will appear on top of the page with confirmation message.
Click the OK button or click Cancel button to remain same changes.
List of Available DID:
List of available DID’s displayed on page, click on check-boxes to select the DID’s.
Click the Assign Selected button to assign the DID’s as shown below:
Click on Refresh button to refresh the extension list:
Click on Cancel button to discard changes and show user list:
To Add New User:
Move the cursor on New User on top right side of page.
Click on New User button, a window form will appear on screen that contain required fields, fill the specified fields such as:
- User Name: Write name of user in text box.
- Status: Click on Drop-Down button, select active from list.
- User Role: To select Role a pick list will appear on page containing all available roles.
- Password: Set password and pin code in text box.
Personal Contact Info:
Email
First & Last Name
Phone
Mobile
Street Address
Company
Country
Click on Drop-Down list, Select Country name from list.
Locale Settings:
Timezone Offset: Click on Drop-Down list, Select Timezone from list.
Language: Click on Drop-Down list, Select suitable Language to understand from list.
Click on Save button to save the settings.
Click on Arrow button to reset the settings.
Click on Cancel button to discard changes as shown below:
Agent/Extensions:
Click on Agent/Extensions menu button from menu, a window container will appear on screen that contain list of extensions and detail as shown below:
Click on check-boxes to select the extension from list.
Click the Delete Selected button to delete the selected record, a pop-up confirmation message will appear on top of the page.
Click on OK button to delete the record or click on Cancel button remain same changes.
Click on Edit button, a pop-up form will appear on screen that contain all configurable fields such as:
Extension Detail:
Type Agent name and Agent Number in text box.
Agent:
Webphone: Click on Drop-Down button select active
Password: Set Password in text box.
Click on Save button to save the settings.
Click on Arrow button to reset the settings.
Click on Cancel button to discard changes as shown below:
To Add New Extension:
Move the cursor on New Extension on top right side of page.
Click on New Extension button, a pop-up form will appear on screen that contain required fields, fill the specified fields such as:
- Extension
- Agent Name
- Agent Number
Click on Drop-Down button, a list will appear on page, user can forward any extension to external call center or IVR system.
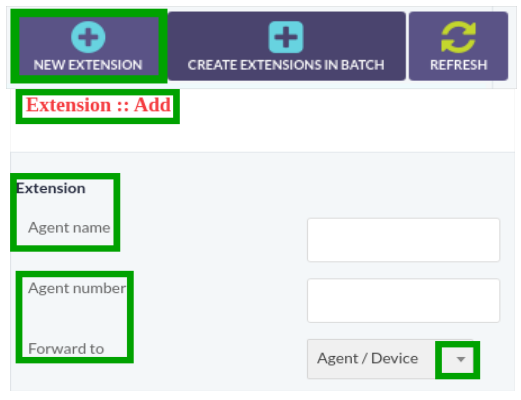
Agent:
Webphone: Click on Drop-Down button select active
Password: Set Password in tex box.
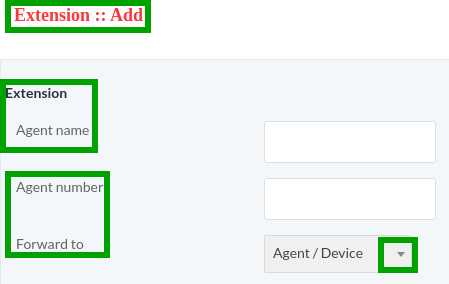
Click on Save button to save the settings.
Click on Arrow button to reset the settings.
Click on Cancel button to discard changes as shown below:
Create Extensions in Batch:
Move the cursor on New Extension on top right side of page.
Click on New Extension button, a pop-up form will appear on screen that contain required fields, fill the specified fields such as:
- Extension Range: Set extension range in text box.
- Forward: Click on Drop-Down button, a list will appear on page, user can forward any extension to external call center or IVR system.
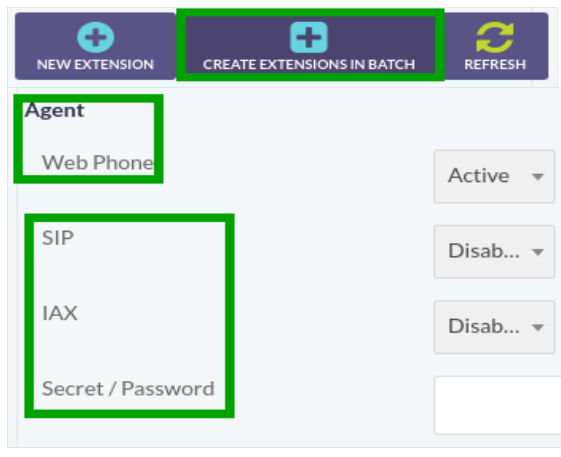
Agent:
Webphone: Click on Drop-Down button select active
Password: Set Password in text box.
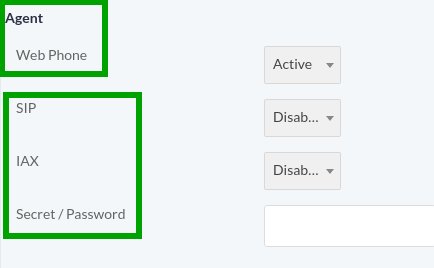
Click on Save button to save the settings.
Click on Arrow button to reset the settings.
Click on Cancel button to discard changes as shown below:
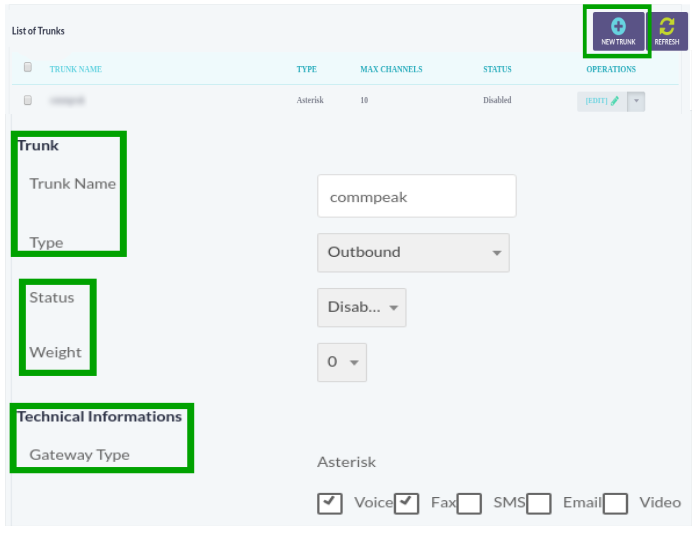
Gateways:
Click on Gateways menu button from main menu, a window container will display on screen that contain list of trunks as shown below:

Click on check-boxes to select the trunk from list.
Click the Delete Selected button to delete the selected record, a pop-up confirmation message will appear on top of the page.
Click on OK button to delete the record or click on Cancel button remain same changes.
Click on Edit button, a window form will appear on screen that contain required fields, fill the specified fields such as:
- Trunk Name: Write trunk name in text box.
- Type: Click on Drop-Down button, select type from drop-down list:
- Status: To status for trunk, select active or disable from drop-down list:
- Wright: Weight sets priority of trunk. Trunk will lower values will be preferred from others while doing route selection Node: Select the type of nodes.
- Technical Information’s :
Following check-boxes are available to select gateway type shown below:

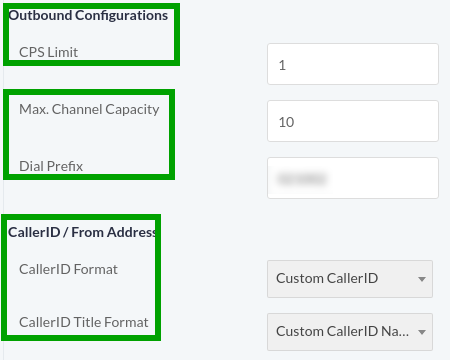
Outbound Configuration:
- CPS limit: Set amount of the CPS limit in the text box.
- Max Channel Capacity: Set amount of Number of Maximum channel allowed.
- Dial Prefix: If any prefix required by this trunk.
- Caller ID format: Select the format Caller ID from drop-down.
- Title Format: Select the Caller ID title format from drop-down.
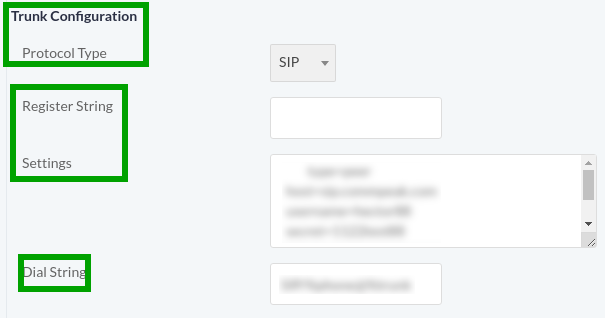
Trunk Configuration:
- Protocol Type: Select protocol type from drop-down list. IAX or SIP
- Register String: Only if asked or required by trunk.
- Setting: Type, Host, User and Password for connecting to this trunk.
Click on Save button to save the settings.
Click on Arrow button to reset the settings.
Click on Cancel button to discard changes as shown below:
To Add New Trunk:
Move the cursor on New Trunk on top right of the page.
Click on New Trunk button, a window form will appear on screen that contain required fields, fill the specified such as:
- Trunk Name: Type Name of Trunk in text box.
- Type: Click on Drop-Down button, select type from drop-down list:
- Status: To status for trunk, select active or disable from drop-down list:
- Weight: Weight sets priority of trunk. Trunk will lower values will be preferred from others while doing route selection Node: Select the type of nodes.
- Technical Information’s: Following check-boxes are available to select gateway type shown below:
Outbound Configuration:
- CPS limit: Set amount of the CPS limit in the text box.
- Max Channel Capacity: Set amount of Number of Maximum channel allowed.
- Dial Prefix: If any prefix required by this trunk.
- Caller ID format: Select the format Caller ID from drop-down.
- Title Format: Select the Caller ID title format from drop-down.
Trunk Configuration:
- Protocol Type: Select protocol type from drop-down list. IAX or SIP
- Register String: Only if asked or required by trunk.
- Setting: Type, Host, User and Password for connecting to this trunk.
Click on Save button to save the settings.
Click on Arrow button to reset the settings.
Click on Cancel button to discard changes as shown below:
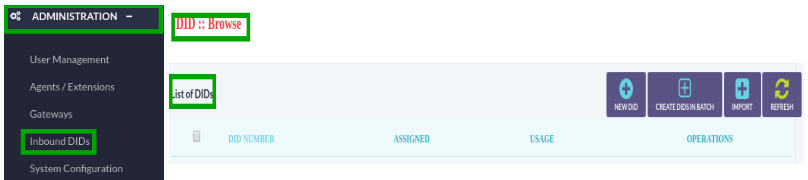
Inbound DID’s:
Click on Inbound DID’s menu button from emnu, a window container will displayed screen that contain list of all DID’s as shown below:
You can remove any record from list, click on check-boxes to select the DID’s from list.
Click the Remove Selected button to remove the selected record, a pop-up will appear on top of the page with confirmation message.
Click the OK button or click Cancel button to remain same changes.
To Add New DID:
Click on New DID button on top right of page, a pop-up form will appear on screen that contain required fields, fill the specified fields such as:
- Enter DID number in text box.
- Type description about DID.
- Select user from list to assign DID.
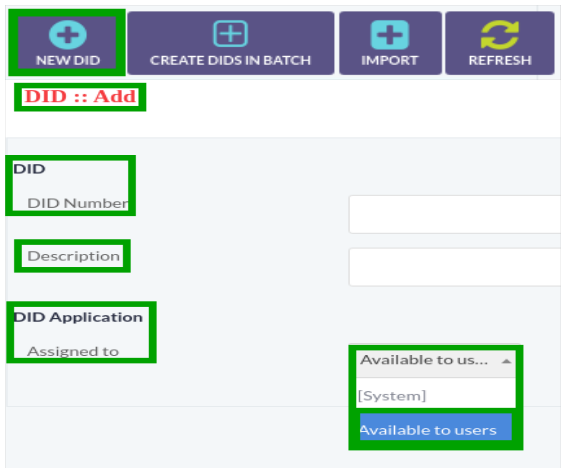
Click on Save button to save the settings.
Click on Arrow button to reset the settings.
Click on Cancel button to discard changes as shown below:
To Create DID’s in Batch:
Click on Create DID’s in Batch button on top of the page, a pop-up form will appear on screen that contain required fields, fill the specified fields such as:
- Set the range in text box to create DID batch.
- Type description about DID.
- Select user from list to assign DID.
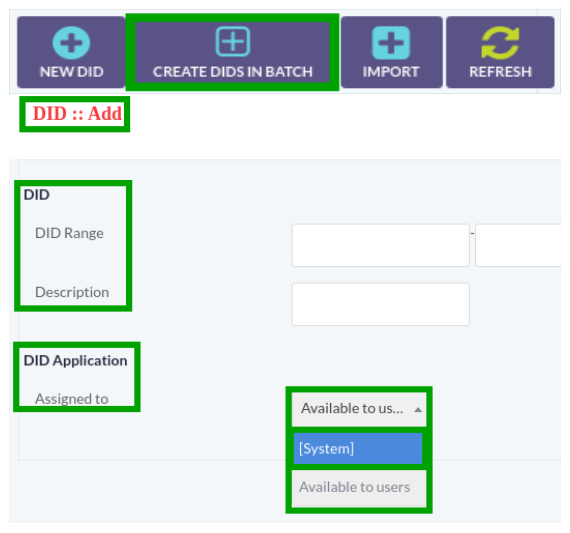
Click on Save button to save the settings.
Click on Arrow button to reset the settings.
Click on Cancel button to discard changes as shown below:
Import New DID’s:
Click on Import button, a pop-up form will appear on screen that contain required fields, fill the specified fields such as:
- To upload DID list, click on Choose File command button, a dialog box will appear on screen to select document.
- Navigate to the location of file on your computer.
- Double clicking or select a file from location and click on Open button, file will be uploaded as shown below:
- Assigned to: Click on Drop-Down button, select Available to Users from drop-down list:
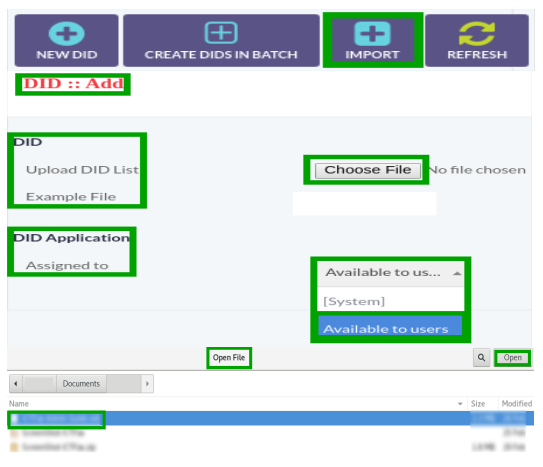
Click on Refresh button to refresh the did list:
Click on Save button to save the settings.
Click on Arrow button to reset the settings.
Click on Cancel button to discard changes as shown below:
System Configuration:
Click on System Configuration menu button from menu, a window container will appear on screen.
A Menu bar displayed on top of page that contain following options for system configuration as shown below:

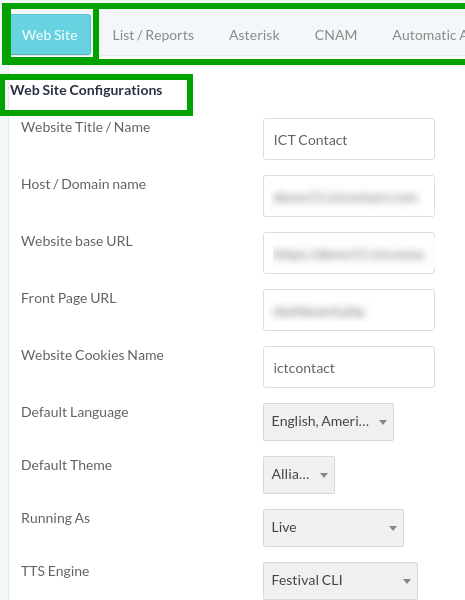
Web Site:
Click on Web Site menu button from menu bar, following configurable fields will appear on page:
- It allows admin to change various options related to the Web site URLs and appearance.
- Website Title allows to set custom title of Broadcasting.
- Domain Name allows to set custom host/domain name. This option creates a link at title/logo of ICTContact header.
- Website base URL tells where on the web server ICTContact can be located (directory path at web server).
- Front page URL allows to set custom first page title. It can be helpful to redirect user to some custom page.
- Website cookie Name is the cookie (temporary text file) that is stored at the client machine.
- Default Language allows to set default language for ICTContact system.
- Running As tells the status of the ICTContact system whether it is demo or live_h)TTS engine_select the type.
Click on Save button to save the settings.
Click on Refresh button to refresh the configuration.

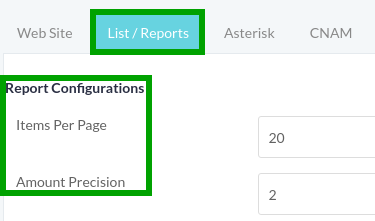
List/Reports:
Set options to display lists and reports.
1. Items per page:
Items to display in a list at a time (pagination).
2. Amount Precision:
Display amount (currency) digits of precision.
Click on Save button to save the settings.
Click on Refresh button to refresh the configuration.
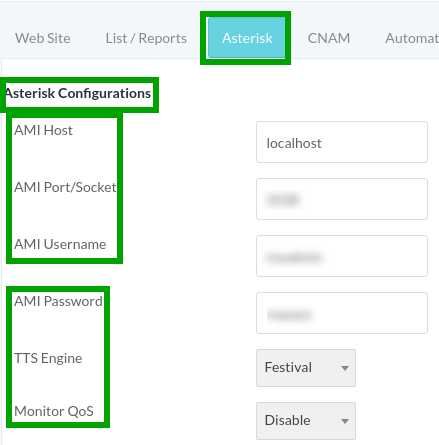
Asterisk:
It tells the configuration options for connecting to the asterisk server.
- AMI Host:
IP address (alias) where database is hosted. - AMI Port:
Port of the database to connect to. - AMI Username:
Name of the user to connect to asterisk. - AMI Password:
Password of the above user to connect to asterisk. - TTS engine:
Select the type from drop-down list. - Monitor QoS:
As enabled or disabled.
Click on Save button to save the settings.
Click on Refresh button to refresh the configuration.
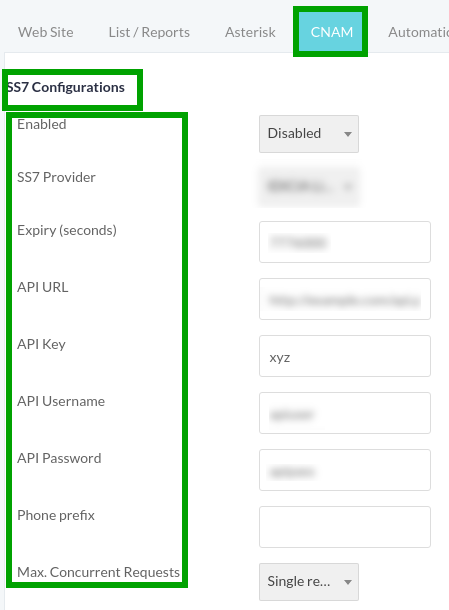
CNAM:
It tells the configuration for SS7 in server:
- Enable:
Select Enable or Disable to activate CNAM. - SS7 Provider:
Select telecommunication standard from drop-down list. - Expiry (Second).
Set time duration time to update CNAM record. - API URL:
Write API URL in the text box. - API Key:
Write API key in the Text box. - API Username:
Write API Username in the Text box. - API Password:
Write API Password in the Text box. - Phone Prefix:
Write format of phone number to set phone prefix. - Max. Concurrent Requests:
Click on Drop-Down button to select max concurrent requests from list:
Click on Save button to save the settings.
Click on Refresh button to refresh the configuration.
Automatic Answering Machine (AMD):
- Click on Automatic Answering Machine from menu bar.
- To configure AMD following fields will appear on page such as:
- Checking Silence Duration(3500):
- Greeting(1800):
- After Greeting(1200):
- Total Time(5000):
- Minimum Length(120):
- Silence Length(50):
- Maximum Words(4):
- Silence Threshold(256):
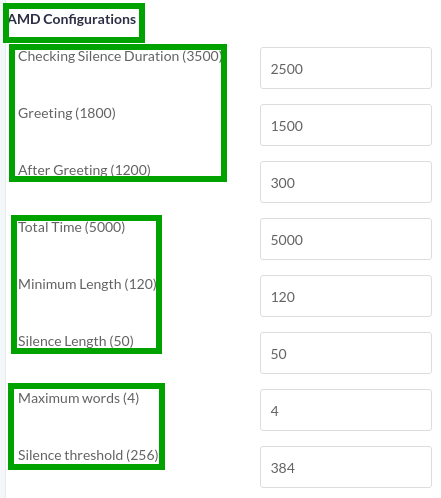
Click on Save button to save the settings.
Click on Refresh button to refresh the configuration.
Provisioning:
- Click on Provisioning button from menu bar.
- To configure Phone Provisioning following fields will appear on page such as:
- Host
- SIP Port
- Wss Port
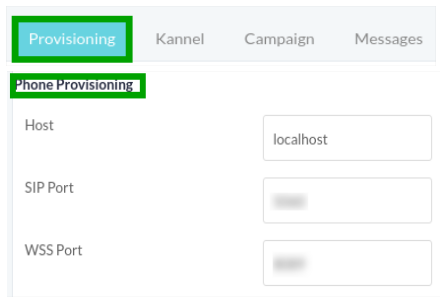
Click on Save button to save the settings.
Click on Refresh button to refresh the configuration.
Kannel:
It tells the configuration options for connecting to the kannel server.
- Kannel Host:
IP address (alias) where kannel is hosted. - Kannel Port:
Port of the database to connect to. - Kannel Username:
Name of the database user to connect to kannel. - Kannel Password:
Password of the above user to connect to kannel. - URL path for send SMS:
Path to the send SMS library of Kannel. - Kannel Message Size:
Size of the Kannel message.
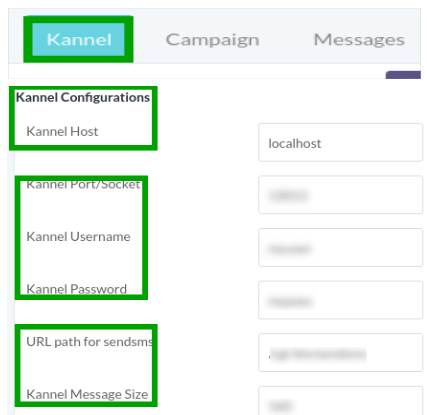
Click on Save button to save the settings.
Click on Refresh button to refresh the configuration.
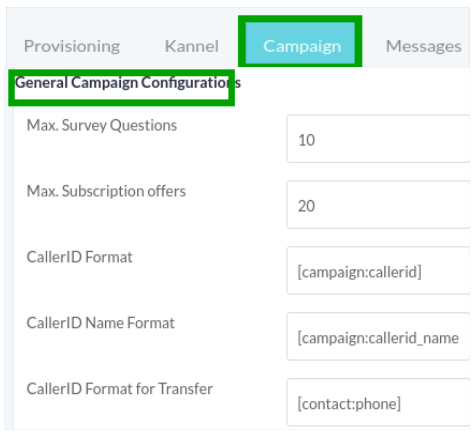
Campaign:
i) General Campaign Configurations:
It allow to configure global options for all the campaigns.
- Maximum Survey question:
Maximum number of questions allowed in per survey campaign. - Maximum Subscription offers:
Maximum number of offers allowed in per Subscription campaign. - Caller ID Format:
Sets default caller id for outbound campaigns. Admin can set any value here and it will be used as global caller id. Admin can also use tokens (variables) here such as [campaign:caller-id]. It tells system to use caller id set by individual campaign. - Caller ID Name Format:
Set default caller id title for outbound campaigns. Similar to above, admin can use any value or token ([campaign:caller-id_name]) in this field - Caller ID Format Transfer:
Set caller id on transfer. For example, when call is transferred to call center / Agents. Admin can use [contact:phone] to show call recipients phone number when they are transferred to agents. - Caller ID Name Format for Transfer:
Set caller id on transfer. For example, when call is transferred to call center / Agents. Admin can use [contact:first_name contact:last_name] to show call recipients phone number when they are transferred to agents. - Channel Incremental:
Per step channel incremental while increasing or decreasing channels of running campaigns.
ii) Default Campaign Parameters for User:
- Key press Timeout:
Max time to wait for user to allow him to press his desired key. - DNC Key:
Call recipient will have to press this key on his dial pad to add his number to DNC. - Global DNC :
If enabled then contact will be checked again. - Message Replay Key:
Call recipient will have to press this key on his dial pad when he wants to receive current IVR message. - Auto Message Replay:
If call recipient fail to reply then automatically repeat IVR message. - Max Message Replay:
After this number of repeat tries current IVR message will be skipped. - Block Cell:
Select the number to disable or enable. - Channel per Campaign:
Maximum number of channels for each campaign. - Max Allowed Call Retries:
Set maximum number of call retries option. If set to disabled, then Max Retries option will not be displayed on campaign form. - Repeat Contacts:
Set how contact will be repeated to dial. Whether to repeat all contacts or just repeat those which are marked fail on previous attempt. - Call monitoring:Number of calls monitoring
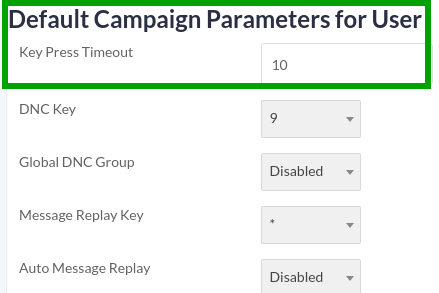
Click on Save button to save the settings.
Click on Refresh button to refresh the configuration.
Messages:
Message configuration: Select a recorded message, which will be played when user failed to enter valid option.
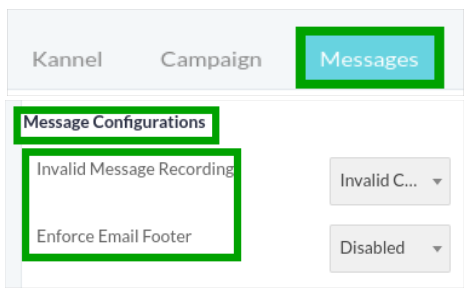
Click on Save button to save the settings.
Click on Refresh button to refresh the configuration.
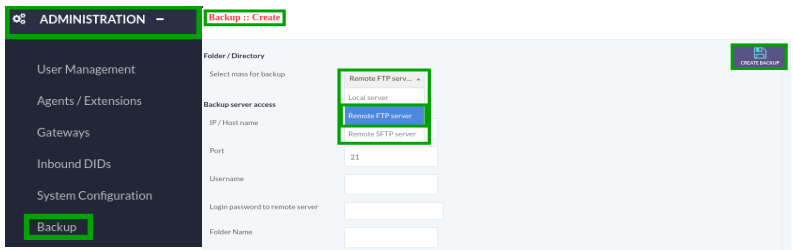
Backup:
Click on Backup menu button from menu, a window form will appear that contain required fields to create backup.
Fill the specified fields such as:
- Folder/Directory:
- Select mass for backup:
Click on Drop-Down button to select mass for backup, a list will appear on page that contain following options, select one option from list as shown below:
- Backup Server Access
- IP Host name
- Port
- Username
- Login password to remote server
- Folder Name
- Click on Create Backup button to create and save a new backup as shown below:
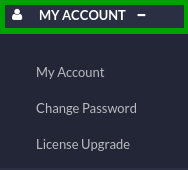
13. Account:
Click on My Account menu button from main meny, following sub-menus will appear on screen such as:
- My Account
- Change Password
- License Upgrade
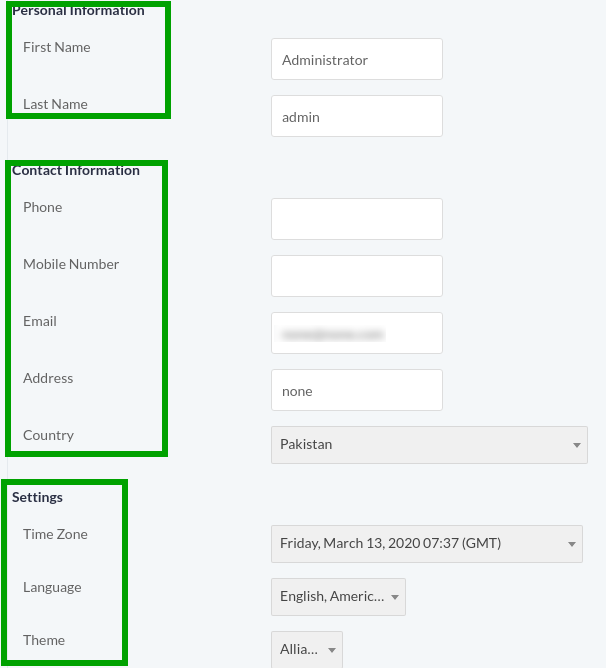
My Account:
Click on My Account menu button from menu, a window will displayed on screen that contain account information as shown below:
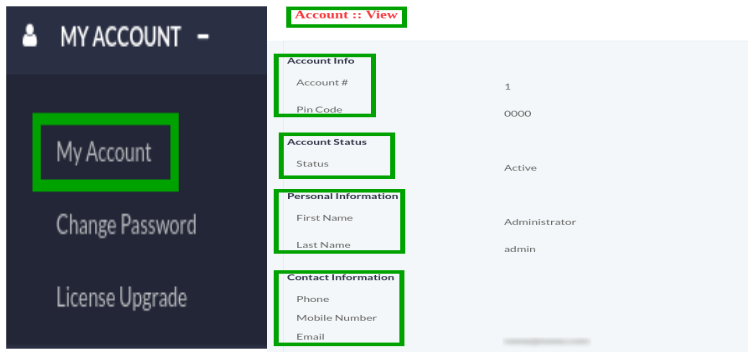
Move the cursor on Edit on top right side of page.
Click on Edit button, a window form will open that contain following fields that are configurable such as:
Personal Contact Info
- First & Last Name
- Phone
- Mobile
- Street Address
- Company
- Country
Click on Drop-Down list, Select Country name from list.
Settings:
- Timezone Offset: Click on Drop-Down list, Select Timezone from list.
- Language: Click on Drop-Down list, Select suitable Language to
understand from list. - Theme: Select theme from drop-down list:
Click on Save button to save the settings.
Click on Arrow button to reset the settings.
Click on Cancel button to discard changes as shown below:
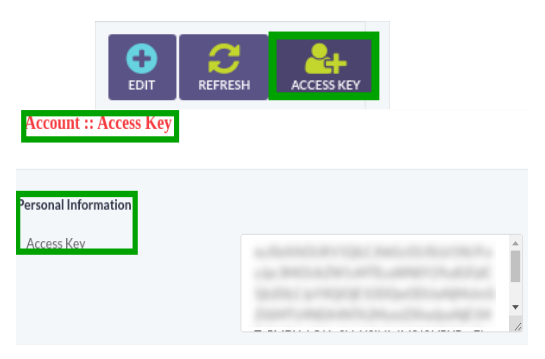
Move the cursor on Access Key button top right side of the page.
Click on Access Key button to get access key for account as shown below:
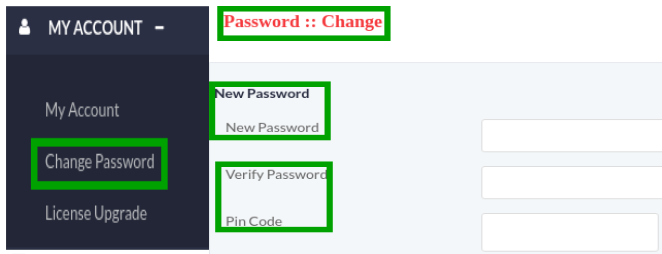
Change Password:
- Click on Change Password menu button to create password, a pop-up form will appear on screen that contain required fields, fill the specified fields such as:
- Create New Password in text box.
- Type Password for verification in text box.
- Enter Pic Code in text box.
Click on Save button to save the settings.
Click on Arrow button to reset the settings.
Click on Cancel button to discard changes as shown below:
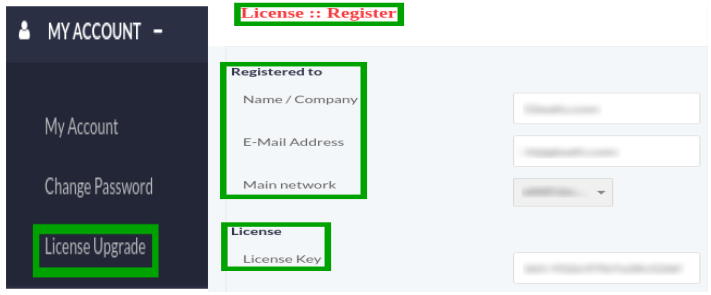
License Upgrade:
Click on License Upgrade button from menu, a window container will appear on screen that contain following fields, fill the specified fields to for license registration that are as follows:
Registered to:
- Name/Company: Enter the name of organization in the text box.
- E-Mail Address: Enter user email address in the text box.
- Main Network: Select main network.
- License: Enter license key in the text box.
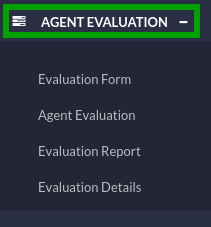
14. Agent Evaluation:
Click on Agent Evaluation menu button from main menu, following sub-menus will appear on screen as shown below:
Evaluation Form:
Click on Evaluation Form menu button from menu, a window container will appear on screen that contain list of evaluation forms and detail as shown below:
Click on check-boxes to select the evaluation form from list.
Click the Delete Selected button to delete the selected record, a pop-up confirmation message will appear on top of the page.
Click on OK button to delete the record or click on Cancel button remain same changes.
Click on Edit button, a pop-up form will appear on screen that contain all configurable fields, fill the specified fields such as:
- Evaluation Form Info:
- Type Form Title and Description in text box.
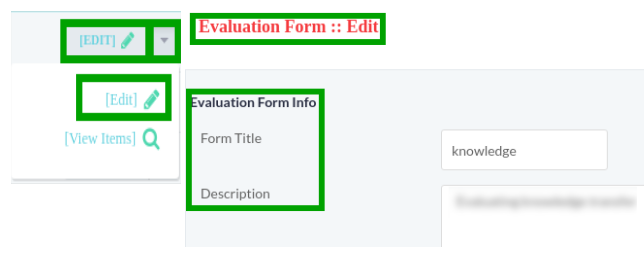
Click on Save button to save the settings.
Click on Arrow button to reset the settings.
Click on Cancel button to discard changes as shown below:
To Add New Evaluation Form:
Move the cursor on New Form on top right of side of page.
Click on New Form button, a window form will appear on screen that contain required
fields, fill the specified fields such as:
- Evaluation Form Info:
- Type Form Title and Description in text box.
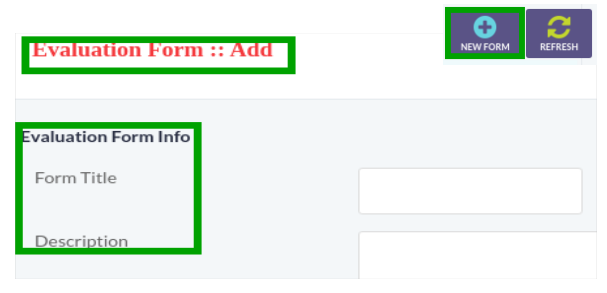
Click on Save button to save the settings.
Click on Arrow button to reset the settings.
Click on Cancel button to discard changes as shown below:
Agent Evaluation:
Click on Agent Evaluation menu button from menu, a window container will appear on screen that contain following fields to evaluate the performance of the agents according to selected date, fill the following fields such as:
- Filter Settings
- Company Name
User: Click on Drop-Down button, select user from drop-down list.
Agent/Extension: Click on Drop-Down button, select Agent/Extension from drop-down list.
Date: Select date in text box to filter out the results.
Click on Search Button, list of call detail report will be displayed below of the page:
Click on Reset button to reset the settings.
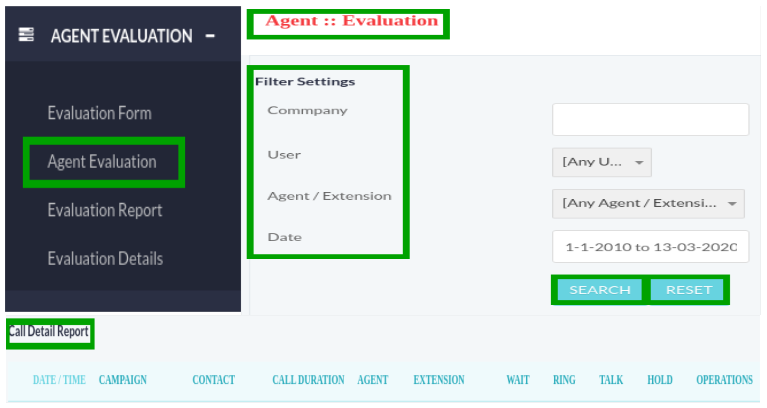
Click on Refresh button to refresh the agent evaluation.
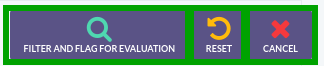
Click on Flag For Evaluation button, a window container will appear on screen that contain required fields, fill the specified fields to search and flag matching calls for evaluation as shown below:
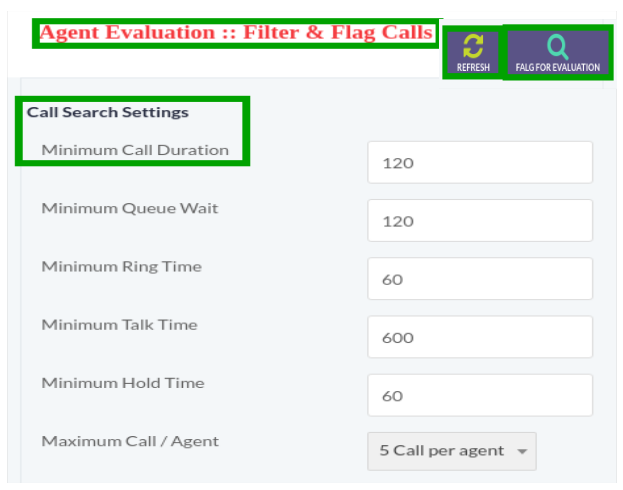
Click on Filter And Flag Evaluation button for Search and Flag matching calls for
evaluation:
Click on Reset button to reset the evaluation form.
Click on Cancel button to discard changes and show evaluation list:
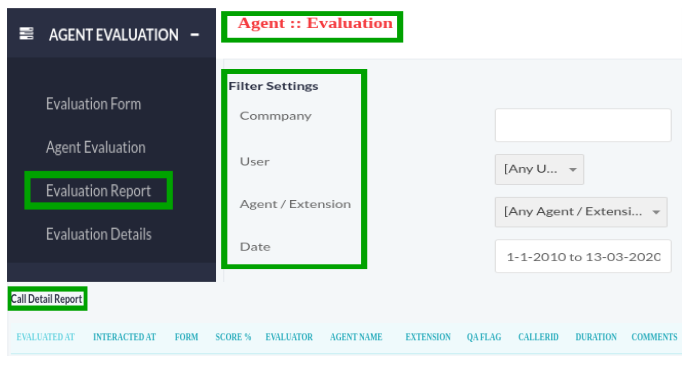
Evaluation Report:
Click on Evaluation Report menu button from menu, a window container will appear on screen that contain following fields to evaluate the performance of the agents according to selected date. Fill the following fields such as:
- Filter Settings:
- Company Name:
User: Click on Drop-Down button, select user from drop-down list.
Agent/Extension: Click on Drop-Down button, select Agent/Extension from drop-down list.
Date: Select date in text box to filter out the results.
Click on Search Button, list of call detail report will be displayed below of the page:
Click on Reset button to reset the settings.
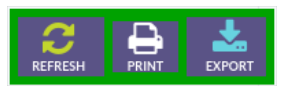
Click on Refresh button to refresh the page.
Click on Print button to print the evaluation report.
Click on Export button to export evaluation report in CSV.
Evaluation Details:
Click on Evaluation Details menu button from menu, a window container will appear on screen that contain following fields to evaluate the performance of the agents according to selected date. Fill the following fields such as:
- Filter Settings:
- Company Name
User: Click on Drop-Down button, select user from drop-down list.
Agent/Extension: Click on Drop-Down button, select Agent/Extension from drop-down list.
Date: Select date in text box to filter out the results.
Click on Search Button, list of call detail report will be displayed below of the page.
Click on Reset button to reset the settings.
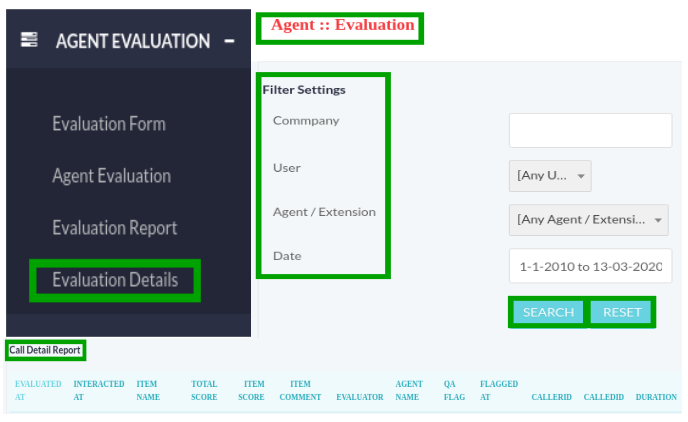
Click on Refresh button to refresh the page.
Click on Print button to print the evaluation report.
Click on Export button to export evaluation report in CSV.
Additional Guide Sections
The following sections were added in April 2026, covering features not in the original guide.
| Section | What It Covers |
|---|---|
| Dashboard Guide | All 9 real-time metric cards, charts, Top Agents table, Live Agent Statistics, Node Stats |
| Reports Guide | CDR, Live Statistics, Agent Statistics, Disposition Report, Call Recording Report, Campaign Overview |
| IVR Builder Guide | Creating IVR flows, all node types, attaching IVR to campaigns and DIDs |
| Lead Management Guide | Lead Groups, importing leads via CSV, lead status values, DNC management |
| Sales and CRM Guide | Deals pipeline, Deal Groups, Deal Calendar, Quotes, Invoices |
| CRM Integrations Guide | Salesforce, HubSpot, SuiteCRM, Vtiger, EspoCRM, YetiForce integration setup |
| Disposition Management Guide | Custom dispositions, CRM field mapping, disposition reports |
| Billing, Routes and Rate Plans | Route patterns, rate plans, bulk rate import, payment management |
| Supervisor Panel Guide | Supervisor login, live agent monitoring, queue visibility, force-logout |
| FAX Documents Guide | Sending and receiving faxes, managing fax queues |
| Client Management Guide | Multi-tenant setup, client provisioning, resource limits, reseller billing |
| Message Designer Guide | Building SMS and outbound text message templates |
| Quick Start Guide | Launch your first campaign in 10 minutes, step-by-step onboarding |