ICTContactt is a unique auto dialer that can be used as an automated appointment reminder software. Appointment reminders in simple words are devices, software application or alarms that help remind us of different events. Appointments are necessary and thus part of every walk of life. Every person desires that any important or minor appointment should not be forgotten.
Importance of appointment reminders
Appointment reminders are conducive to both parties of the appointment. Take a doctor for example. Most of the appointments that are made at the doctor’s office are usually made either a few weeks in advance or sometimes even a month in advance. It is very easy for the appointment to slip from both parties mind since with the normal hustle bustle in life it is quite easy to forget about appointments so far off in the future. Conventionally patients are reminded of their appointments with postcards and calls but both of these are not that feasible. Cards can get misplaced quite easily and there’s no guarantee that the card will reach on time. Making calls to remind the patients of their appointments is costly and a lot of precious time is wasted. Thus appointment reminders made virtually are far more reliable and feasible in reminding doctors and patients of their appointments. Appointment alerts also help save the time and resources that a doctor’s secretary usually wastes in making the appointments again and again.
Appointment Reminder Campaign
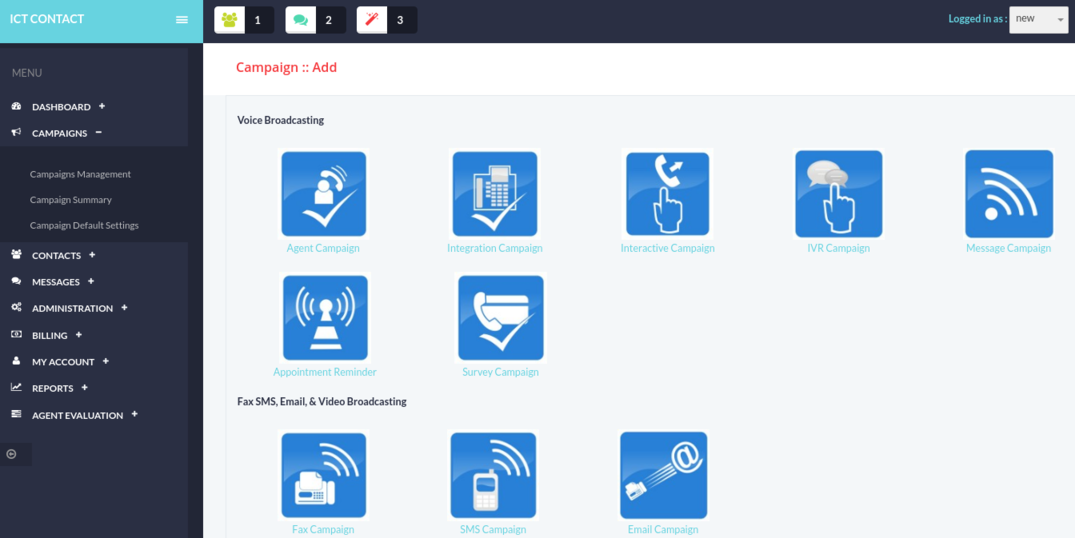
Appointment reminder campaign places a reminder call to all the
contacts in a group. This campaign requires that every contact should
have scheduled appointment start time and appointment end time in any of
the custom fields in contact form. All calls will be placed before
appointment start time. Campaign administrator will set ‘reminder call
time’ in the campaign creation form that will specify how many hours
before the appointment start the call will be placed. There is also a
‘reminder expiry time’ field in the campaign creation form that makes
sure no calls should be placed after the expiry time. When admin/user
selects this campaign, it will open a form that lists all the options
and settings for creating this campaign.
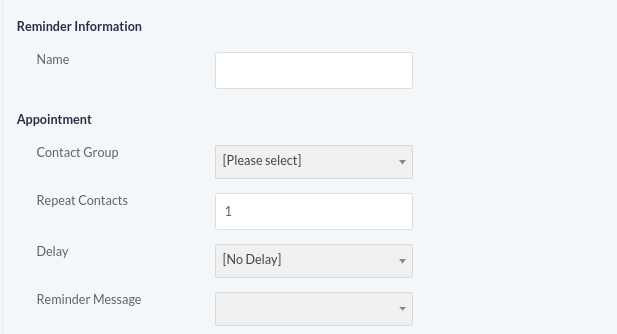
Steps to create a Reminder Campaign
- Navigate to Messages => Message Designer => New IVR Message.
Design a new IVR Message in the message designer and then save the
message.
- Once message is created through message designer, now navigate to
campaign => campaign management => Add New => Reminder
Campaign.
Fill the campaign form with required feilds like:
a) Campaign Name
b) Contact Group
d) Reminder Message
e) Appointment Type: Appointment type can be either individual or group.
Individual Reminder

In individual reminder, every contact that is dialed may have
different appointment schedule time. Examples of individual appointments
are doctor’s appointment or lawyer’s appointment where each
patient/client have different timings for the meeting. Administrator of
the campaign will select where
the appointments are stored for each contact by selecting the
appropriate value in ‘Appointment Start Field’. Then admin will select
how many hours before the appointment time a reminder call should be
placed. Reminder expiry field will ensure that no call should be placed
after the expiry
time. Campaign schedule will also apply on the calls to ensure legal time calling.
Group Reminder
In group reminder, a group of people will be dialed according to the
campaign schedule time. Examples of group appointments are training
attendees or class/school students where all the members of training or
class students have time for a training session/class. Administrator of
the campaign will himself manage how many days/hours before the
appointment campaign should be run. In group appointments, campaign
scheduling time will apply for dialling contacts.
Message Designer
Message Designer allows to create complex telephony voice messages that can be played when a call is received by some person. It allows to join voice recordings, text to speech, alphabet to speech, numbers and digits to speech, and date and time to speech. It also includes an application to get response of reminder call.
Creating a new IVR Message using Message Designer
- Navigate to Messages => Message Designer => New IVR Message
- Set IVR Message name and description. Initially, IVR Message fieldset
will be empty. This fieldset will be populated when new applications
are created and added to the message.
- Select some application from the ‘Application’ dropdown. This will
open a form with options for the selected application. Configure
application options and click ‘add’ button to add application to the IVR
Message fieldset on the right.
- New application will be added to the end of the message. But message
sequence can be changed by dragging the applications up and down in the
IVR Message fieldset.
- Once message is created as desired, save the message by clicking ‘save’ button on top left of the form.
IVR Message Applications
Following are applications of message designer and their breif description.
Play Audio:
Adds an already upload recording to the current message
TTS:
Adds text to speech to the current message. This text will be converted to voice when call is placed
Say Alpha:
Adds some alphabets or a variable with alphabetic value to the current message
Say Digit:
Adds some digits or a variable with digit value to the current message
Say Number:
Adds some number or a variable with numeric value to the current message
Say Date:
Adds some date or a variable with date value to the current message
Say Time:
Adds some time or a variable with time value to the current message
Confirm Reminder:
Adds interactive behavior to the current message. It plays a voice
message (e.g. asking recipient to press some key). If recipient presses 1
his/her appointment will be confirmed. If recipient presses 2 his/her
appointment will be cancelled. If recipient presses 0 (this key can be
changed) call will be transferred to live agent (agent extension number
can be set in this application)
Using Tokens in IVR Message:
At the moment only TTS, Say Alpha, Say Digit, Say Number, Say Date
and Say Time applications support using tokens in IVR Message. Tokens
are useful when customer specific information is required. Following
pattern is allowed for using tokens in IVR
Message:
[contact:first_name]
When ever above pattern is used, it means first name of contact will be
replaced at this place. Following is a list of Tokens that can be used
in IVR Message:
[campaign:callerid]
[campaign:callerid_name]
[contact:first_name]
[contact:last_name]
[contact:phone]
[contact:email]
[contact:address]
[contact:custom1]
[contact:custom2]
[contact:custom3]
[contact:description]
Reminder Campaign Fields
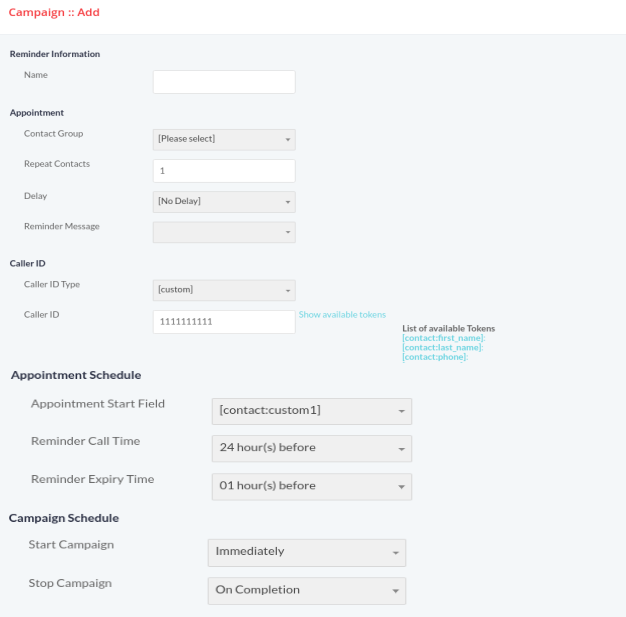
Campaign Name:
Name of the campaign for identification
Contact Group:
Select contact group/List of phone numbers that this campaign will dial.
Campaign Mode:
This is Permanent campaign that means it allows campaign to keep running
even after processing all the contacts and waiting for new contact in
background.
Reminder Message:
Select from list of already created IVR Messages.
Settings:
Max. Concurrent Channels:Maximum number of concurrent channels that said campaign will support.
Max retries:Max number of retries to contact the said contact.
Max call Duration:Maximum allowed duration for each call. after this
duration call will be disconnected automatically , If user is not sure
about duration of call let it be maximum number so that it does not
effect call conversation.
Caller ID:
Caller ID:Enter Caller ID to use with outgoing calls.
Caller Name:Enter caller name to use with outgoing calls
Campaign Schedule:
Start campaign:Schedule campaign start it has following options
a) Immediately:Start campaign immediately just after creation
b) On Scheduled Time:Start campaign on selected data and time
Stop/Pause campaign:Schedule campaign stop time it has following options
a) When Done:Stop campaign when every thing is completed
b) On Scheduled Time:Stop campaign on selected data and time