This integration enables businesses to run and manage outbound call campaigns directly from SuiteCRM by connecting it with ICTContact Contact Center Software. It allows users to synchronize leads, contacts, and campaign data in real time, eliminating the need to switch between systems. Agents can handle calls more efficiently while managers gain better visibility into campaign performance, call statuses, and lead outcomes, all from a single, centralized CRM-driven workflow.
SuiteCRM Integration with ICTContact Contact Center Software:
This integration, powered by REST APIs, automates business processes and allows users to add contacts, leads, and opportunities directly from SuiteCRM into selected campaigns in ICTContact, ensuring a seamless and efficient campaign management workflow.
How to Add the ICTContact Integration in SuiteCRM:
The following are the steps to Add ICTContact integration in SuiteCRM:
- Login to SuiteCRM using your credentials.
- In the top right-hand corner of the screen, click on the user profile icon or your username.
- From the dropdown, select the profile of an already-created user.
- If the user is not created, go to Admin in the top menu, navigate to User Management, click Create New User, fill in the user’s information (name, username, email, etc.), and click Save.
- Enter your ICTContact URL and ICTContact Access Key in the respective fields.
- Fill in any other required user information.

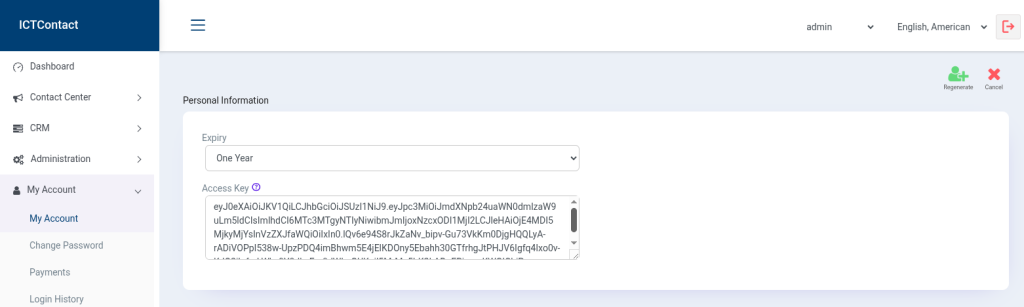
How to get ICTContact Accesskey:
- Login to ICTContact as an admin using your credentials.
- Navigate to the top menu and click on My Account.
- In the Access Key section, you will see your current access key.
- To regenerate a new access key, click on the Regenerate button.
- The new access key will be displayed, and you can copy it for use in integration.

How to Add the SuiteCRM Integration in ICTContact:
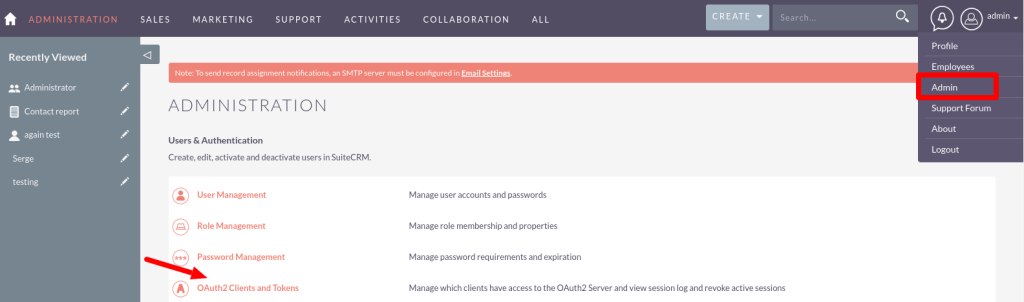
Before you can consume the API, you must first configure SuiteCRM to grant access to a client and add integration in ICTContact. SuiteCRM provides an administrative panel through which you can add clients and revoke tokens. To configure the grant types, select the admin panel, and then select OAuth2 Clients and Tokens.
Client Credentials Grant:
After that, click on the New Client Credentials button to create client credentials. A client credentials grant is the simplest of all of the grant types. This grant is used to authenticate a machine or service. Select new client credentials:
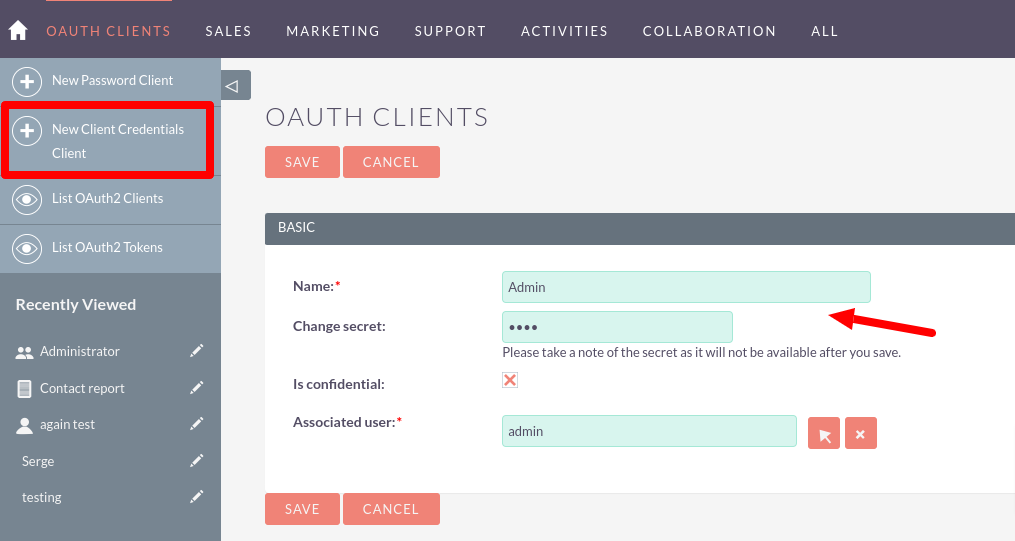
The ‘secret’ will be hashed when saved, and will not be accessible later. The ‘id’ is created by SuiteCRM and will be visible once the client is saved.
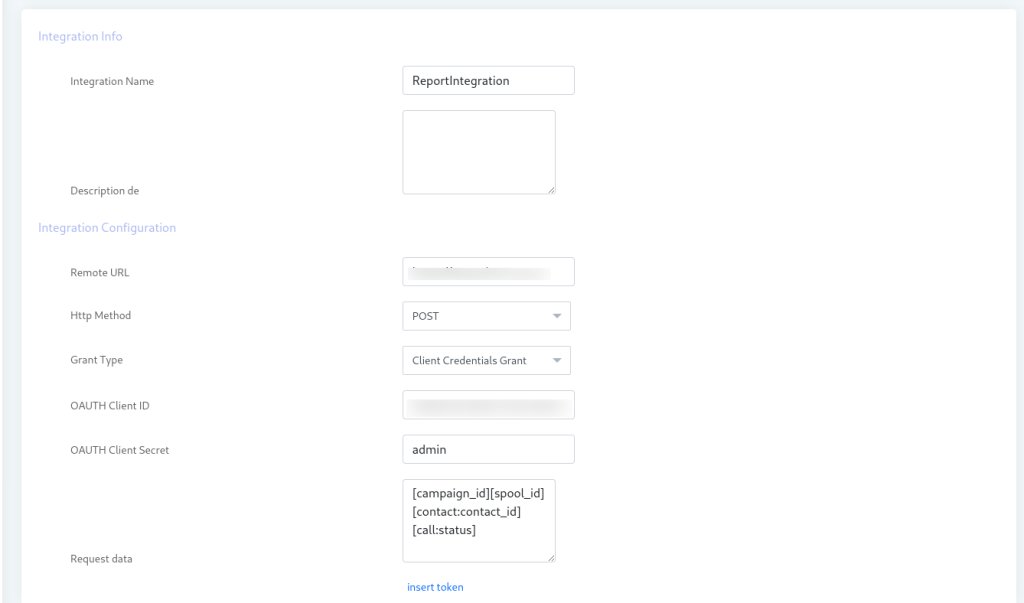
- Login to ICTContact using your credentials.
- Click on the Messages section in the main menu.
- Navigate to Integration and then click on Add Integration.
- From the Integration Type dropdown, select SuiteCRM HTTP request.
- Insert the Remote URL where SuiteCRM is hosted.
- Select the appropriate Grant Type from the options provided.
- Enter the OAuth Client ID and OAuth Client Secret associated with your SuiteCRM setup.
- After entering all the required information, click on Save to complete the integration.
Export Leads/Contacts/ Opportunities into ICTContact target campaign:
There will be an option in SuiteCRM to search or Filter contacts/leads/opportunities, and then export the selected leads/contacts/opportunities to the targeted campaign in ICTContact.
How to export:
Select Leads/Contact/Opportunities from the Sales Menu and click on the View button. Then the lead/contact list is displayed, and then select leads/contact which you want to export to ICTContact, and then select export from the Bulk action drop-down list.
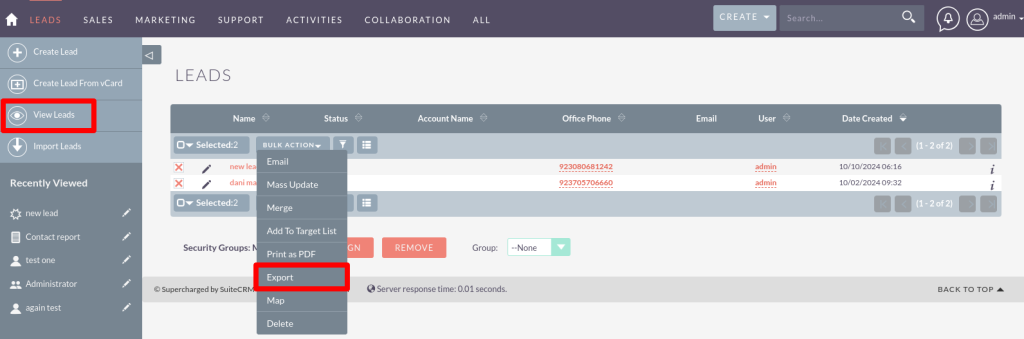
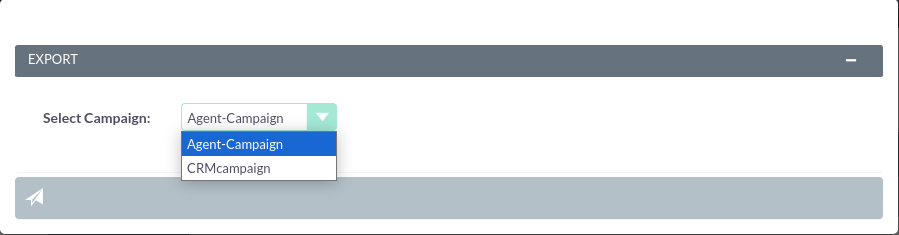
A dialog box will display. And select a campaign from the drop-down list and click on the export button, then the selected leads will export in targeted campaign successfully.
Follow the same steps for Export the Contacts & opportunities in ICTContact targeted Campaign.
Note:
In the target campaign, only those campaigns are displayed whose status is active, and Contact List Closure is set to Wait Contact (API) in ICTContact.
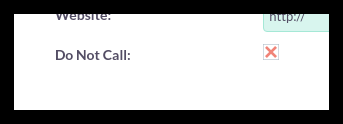
2. DO NOT CALL List:
When you create the Contact/Lead in SuiteCRM and during creation, you set the contact as Do Not Call, then when the contact is exported to a targeted campaign, it will be blocked as DNC and add in ICTContact DNC Contact List.
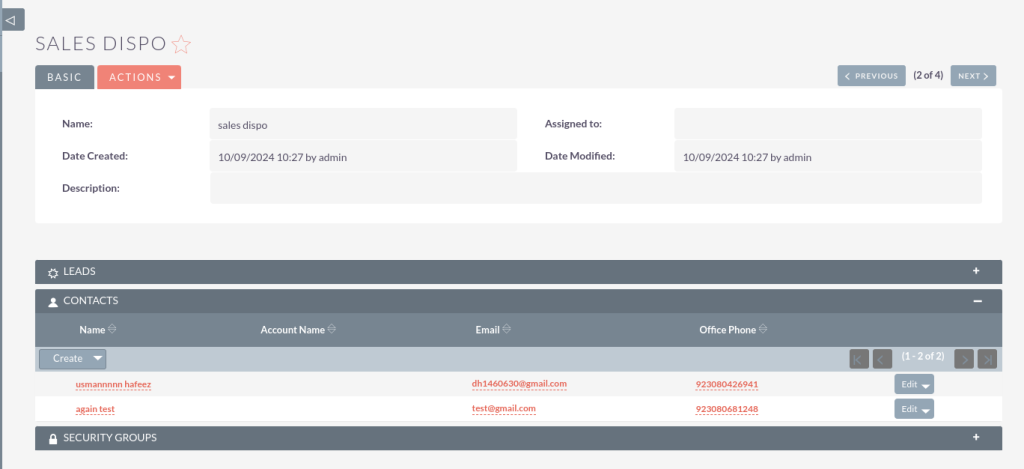
Disposition Management and Synchronization:
ICTContact will offer a GUI, where admin/user can manage a list of dispositions, create/edit, or delete the disposition. In SuiteCRM can create a disposition and export the CRM disposition list into ICTContact.
Export Disposition from SuiteCRM to ICTContact:
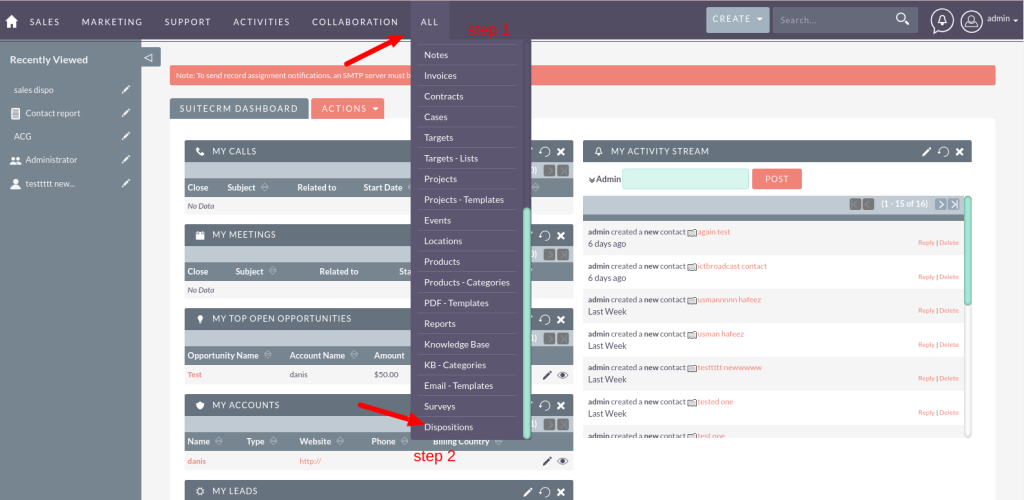
Login into your SuiteCRM. Select Disposition from the All menu. Click on View Disposition, then select the disposition and click on Export into ICTContact from the Bulk action drop-down list.
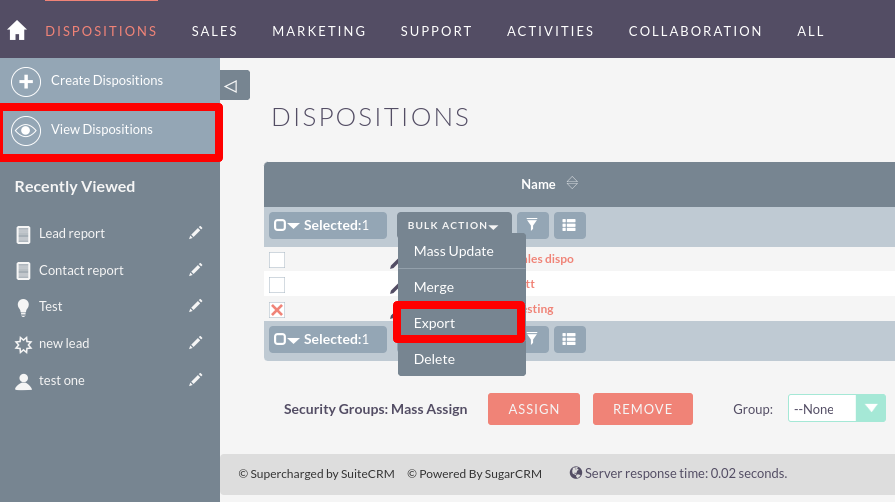
As you export the Disposition in ICTContact it will be added in Disposition menu of ICTContact.

Combined Reports:
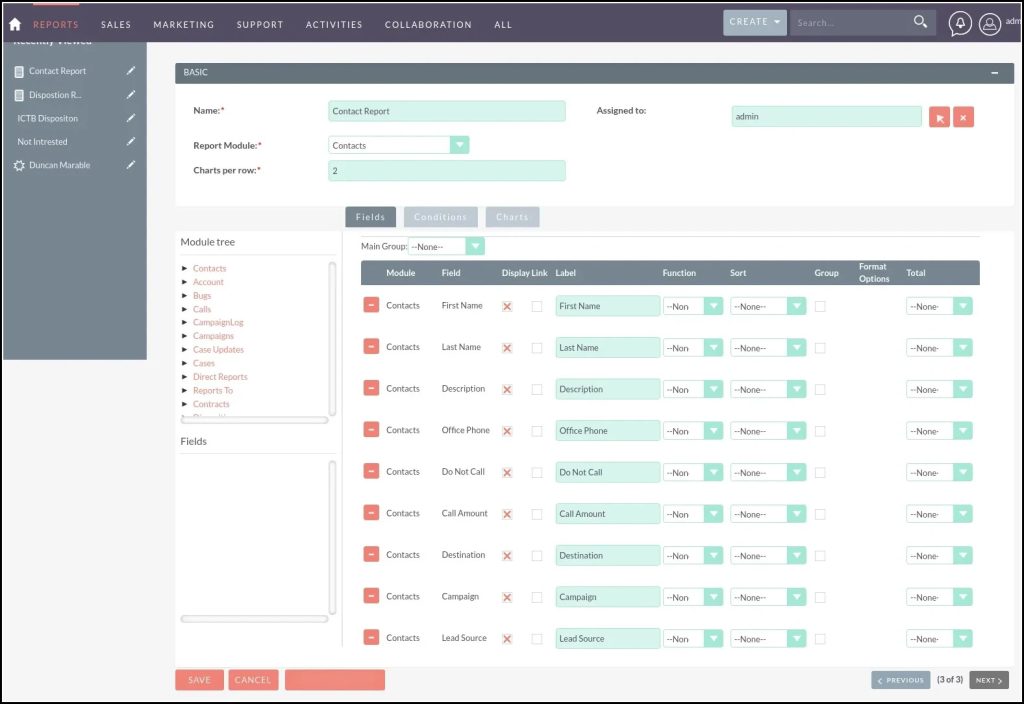
SuiteCRM allows users to see reports. Advanced Open Reports (AOR) is the reporting module within SuiteCRM. AOR can be accessed by clicking the ‘Reports’ link within the navigation menu. The reporting module allows users to report on CRM data from any module and has many features to display key information quickly.
Steps:
- You will be shown the report Edit View.
- To get a list of fields to add to the report, select a module from the “Report Module” drop-down.
- After selecting a Report Module, the available fields will appear on the left panel.
- To add fields to the “Fields” section of the report:
- Expand the module you want to choose fields from.
- Drag and drop the desired fields into the “Fields” section.
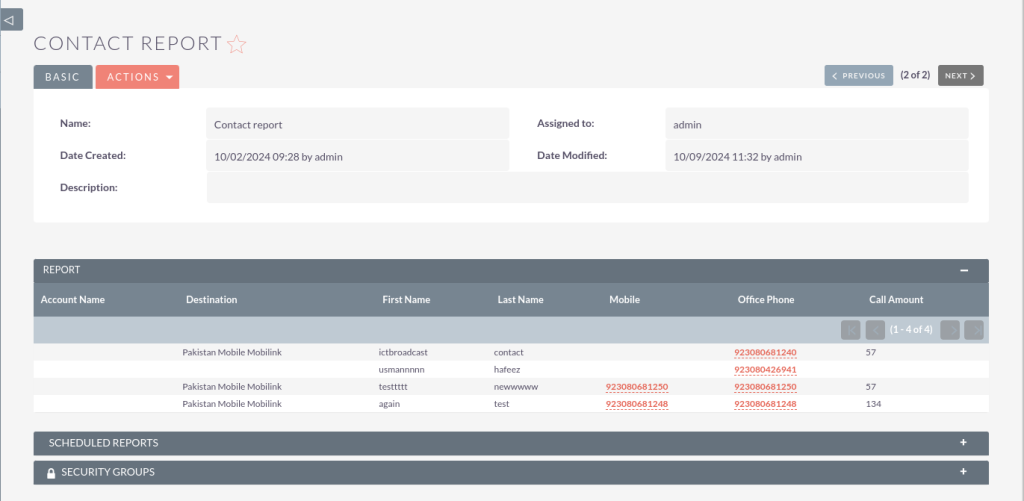
Export Report Data from ICTContact into SuiteCRM Report Modules:
- When a contact/lead is exported and dialed in ICTContact, the system will track the call.
- After the call ends, the contact/lead data will be added to the Contact or Lead Report Module for future reference.
Note:
If you export leads into a targeted campaign, the report will be added/updated in the lead report, and the same for contacts if you export contacts into an ICTContact targeted campaign, then after the call end report will update the Contact report.
Disposition report:
After the call ends, the agent will select the created and synchronized disposition, add a comment, and submit it.
Steps for how to check the Disposition report:
-
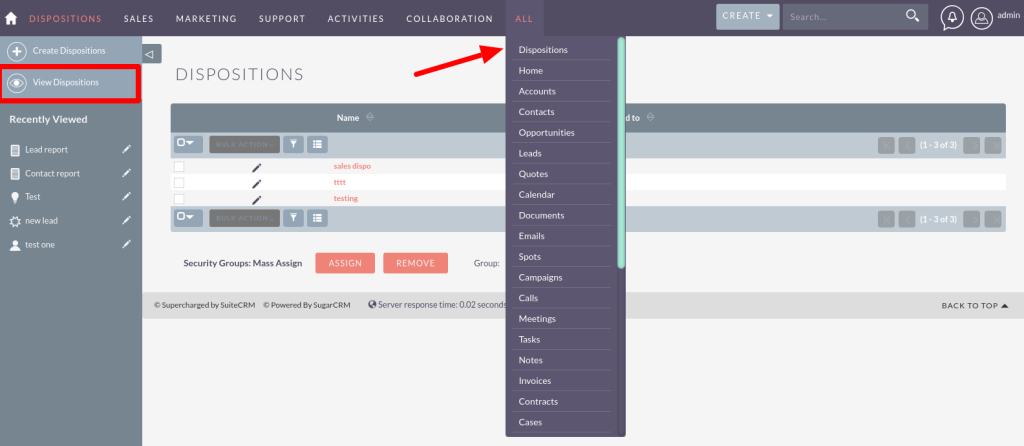
- Login to SuiteCRM as Admin.
- From the menu bar, click on “ALL” and select the Disposition from it.
- After that, click on view disposition, and then the disposition list will show as in the image below.
- Then the admin will select a specific disposition from the list and click on it.
- After that, he can see the contacts/leads in disposition as updated by the agent.